Free background from VintageMadeForYou

Thursday 29 December 2011

3 Golden Wedding Anniversary Cards

I have been making Golden Wedding Cards, as the last time I had a stall at a fair, I sold all my Golden Wedding anniversary cards, so had to make some more.  

This card was done with the Nellie Snellen Corner dies with gold foil card under it.  The hearts are also a Nellie Snellen die, the multi frame die.  I have finished it off with some cream pearls, and a sentiment on the computer. 


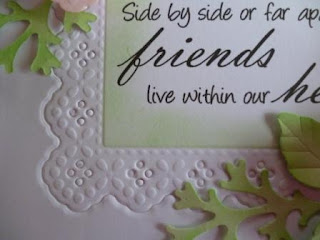
This one is a cream on cream one, and was quite a simple one to make.  It is just layers of cream embossed card, and cream paper that is edged with the Martha Stewart doily lace border punch.  The back embossed card is the Craft Concept Budding Vine folder, and the top one is the K. Kingston leaves and butterflies folder.  I have put ribbon vertically on each piece of embossed card.  The sentiment was done on the computer and then mounted on one of the spellbinder fancy tags two.  Finally a big bow using the Bow easy.  


This one I have done for Fat Cats Card Corner as they provided the Swirl Designables Cut and Emboss folder by Marianne, with gold foil behind it. I have used this for the background and also used the Martha Stewart doily lace border punch from there also, for the right hand edge of the background. The flower I have made with a large and medium sized Retro flower punch which I wet and scrunched.  I have used a pearl brad as the centre.  The sentiment again was done on the computer and then edged with gold.  Lastly the flourish is also from Fat cats card corner and is the Cheery Lynn Fanciful Flourish die.  It is two die cuts I have used.    

Saturday 17 December 2011

Two Wreath Cards

Two more quick cards using the Branch Punch Wreath.


This one was made with the Swirl Designable Cut and Emboss Folder that you can buy at Fat Cats Card Corner .  I love this folder, it is so pretty.  I have edged it with the Martha Stewart Doily Lace border punch, a strip of red and gold ribbon beside it, and some red foil card behind it.    The wreath is decorated with a wider red and gold ribbon, and some glitter balls.  


This one is also mounted on red foil card.  This time I have done the pendant at the back with the Nellie Snellen Fancy Corners.  The Wreath I have mixed the branch punch with the Ash Family punch.  I have again decorated the wreath with glitter baubles and a red and gold bow.  

Helen


Friday 16 December 2011

Door Card with Christmas Wreath

This is a card I have done using the Punched Christmas Wreath.  

I have decorated the wreath with red crystals and a gold bow.  I have used 4 different green papers to make the wreath. The door was made by making 4 panels, each with 3 layers glued on top of each other, slightly smaller than the one below.  The top one I have scored a rectangle about 3mm in from the edge to make it look like bevelled. The panels were then glued on the base card, two at the top and two at the bottom, the base has  two lines each side scored.  
  

I have made a letter slot with two rectangles of gold paper, one with a rectangle cut out of the middle and mounted on the top of the other one.  I made a letter with handwritten 'Merry Christmas' and a stamp drawn on it.  I cut the corner off, so that it looked like it was poking out.  The plate behind the doorknob was the part that was cut out of the rectangle post slot.  I rounded the edges and made a keyhole with a small hole punch and cut a slit underneath it.  The door know was a fancy plastic button embellishment I had that I cut the button shaft off of it. 

This is another colour version of the same card.  


A Punched Christmas Wreath tutorial

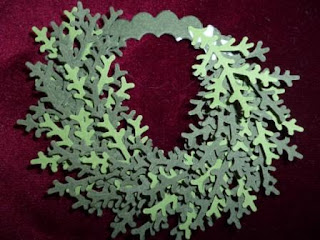
To make a Christmas Wreath with the branch punch you need to punch out lots of punches with green paper.  I have done this one with the Nellie Snellen Branch punch, but the Martha Stewart Branch Punch. I have used two shades of green, but you can do it all with just one colour or use 3 or 4 shades which looks really good too.  You can even mix it up by using other shaped leaves such as holly leaves which gives a fuller look. 
The base is made by using two sizes of a circle spellbinder die, but you could use a larger punch, and one slightly smaller.  The outside circle is about 5cm or 2 inches in diameter and the middle one is about 3.5cm or 1 1/2 inches in diameter. You could even just cut it freehand and with scissors.  It will be completely covered with punches so it won't be seen, so  It doesn't have to be perfect.  

Now you are ready to start gluing the punches onto the ring base, using a craft glue.  All you are gluing is the bottom stalk of the punch.  The rest is left loose, so that it looks more realistic.  Use one main colour and if you are using any other coloured punches, then dot them throughout the wreath every 3-4 and alternate the sides you put them, top or bottom, or middle.  Make sure all the branches are facing the same way.  You will work your way around the base in a spiral pattern.  
As you work around it will start looking like this one.  Keep layering the punches so that it looks full, the more you put on the better it will look and more 3 dimensional.  When you get to the place where you started, you will need to tuck the ends of the branches under the top of the ones where you started, to make it look like the beginning ones are on top of the last ones you are gluing.  


This is how it should look completed.  The centre is just some baking/wax paper that I have the wreath sitting on until the glue dries.  It can then be decorated with crystals and bows etc.  

Friday 9 December 2011

Dark Pink Roses and Sparkle

This card has taken me quite some time to make, by the time I had made the flowers, and worked out what I was going to do.  


Another card for Fat Cats Card Corner, this time to show the Swirl Designables Cut and Emboss folders by Marianne Designs.  

After doing the embossing, I went over the raised parts with some Kindyglitz (Stickles) and then cut the bottom edge with the Martha Steward Doily Lace border punch.  I mounted this on some hot pink foil card.  I mounted this on white card, and then scored round it to make a frame with the Martha Stewart Scoreboard.  


The leaves and flowers are made with a variety of punches that I have.  I edged the lilies with some dark pink stamp ink and they have some glitter stamens to continue the sparkle theme.  


The roses I have edged with kindyglitz to continue this also.  I did the Sentiment on the computer and then cut it out with on of the Pastry Label dies from Memory Box. I hung a butterfly charm off of one end of the tag.   I added some hot pink crystals on the sentiment tag and along the border punch.  The butterflies are also Martha Stewart punches, with a little bit of sparkle as well.  

Apricot card with White Daisy

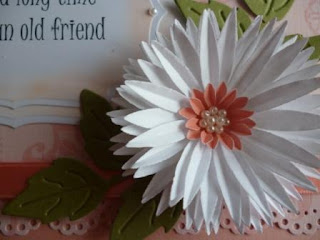
Another card for Fat Cats Card Corner.  This time it was to use the Cheery Lynn Stacker Flowers and leaf dies. Now the die is quite big, so I wasn't sure how it was going to go on a card, but I am rather pleased with it. 


I have done the Sentiment on the computer, and then cut them out with Spellbinder Label Four. Some ribbon and some pearls to 'bling' it up a little.  


Wednesday 7 December 2011

Rose made from frame

This card was done for Fat Cats Card Corner, to show the versatility of the Marianne Craftables Frame dies.  This one is done with the Rectangle frame only, not the flower die.  


This time I didn't cut the die out, but just embossed with it.  There was a fine line between using enough shims to get the embossing detailed enough, but without cutting through the card.  


The flowers were also done with the frame die as well, I cut two frames out for each flower and embossed them.  I then cut the long side off of each side and glued each of the four strips together, one to another, matching up the holes and scallop.  I put a curved slit at the dip of each scallop of the frame, which was to make each petal of the rose.  


Once that was done along  the full length of the strip, it was just a matter of rolling it up with the embossed side inwards, just like you do for a spiral rose, trying to get the petals to be alternated.  I then let it go a little, and then glued it onto a circle punched out.  Finally it was just a matter of folding the petals back and there was a rose!


The leaves were from the Spellbinder Foliage die collection.  

Card for Mum

I have been wanting to have a go at the spiral roses I  have seen on lots of cards lately, so decided to use them on a card I was making for my Mother's birthday at the weekend.  I ended up doing them in white with the edges sponged with mauve ink.  


The sentiment was done on the cardboard and then cut out with an oval spellbinder die.  The Mauve part of the background frame is embossed with the Cuttlebug Tiny Bubbles folder. The white border is done with two of the Spellbinder Parisian Accent medallion dies cut in half, and then each of the corner are done with the corner die in the same set.  The leaves are done also with a spellbinder Foliage die.  Finally a bow and ribbon to finish it off.  


Sunday 4 December 2011

Two Male Cards

I wanted to share two cards I have made for Fat Cats Card Corner.  They are both using the new Marianne Creatables Model T Ford Car Dies.  


The first one is for a Dad, with the Front view of the car die mounted on a frame done with the Nellie Snellen Square Multiframe Die.  The blue background was done with the Cuttlebug Embossing folder called 'Clockwork', the corners were done with the Cuttlebug Vintage dies. The bunting was just cut out from some card, and strung together with a piece of fine string that I tied bows to each end, and glued to the edge of the card.  The Car die has been sponged with some pale blue ink on cream card.


I really like this car die, it has such a lot of detail on it.  The second card I made into a Travel/Bon Voyage type card.  For this I used the back view of the Model T Ford die.  I have mounted it onto two parts, in different colours of the square Nellie Snellen multiframe die.  I added some rub-ons for the words at the bottom, and the postcard, and then made two tickets on the computer and sponged them to make them look old.  The paper for the background and the frame behind the car die, were a couple of papers that have maps drawn on them.  I added some date/country stamps that I had here to follow the travel theme.  


I always find male cards difficult, but these dies certainly gave me a good start to work on some different ones.  

Saturday 26 November 2011

Bird and Blossom

This is a card I have made for Fat Cats Card Corner


I have used the 'Bird on a branch' Marianne Creatables die, which I also used parts of for the branches and leaves at the top as well.  
The frames are two parts of the Nellie Snellen Square Multiframe die. Behind each frame, I have scored some white card in a criss cross pattern with my Martha Stewart Scoreboard.  I have put some pink gems around the outside frame. The border at the bottom is the Martha Stewart Garden Gate Deep Edge border punch.  The flowers are done with the 6 petal set of five Marianne Creatables dies, the smaller one.  Lastly the sentiment was done on the computer and then cut out with the new Pastry Labels by Memory Box.  

Hope you like it.

Sunday 13 November 2011

Thrilling News

I have been given a wonderful opportunity, which I am absolutely thrilled about! 


 Last week I was asked to become one of the 'Fat Cats Card Corner' shop and website's design team.  I love to create cards from new products, so this will be great fun, coming up with something new, for others to use as ideas.  Thanks to Kaaren for giving me this opportunity.  

Some Christmas Quickie Cards

The first one I have just made two baubles, the red one was made with the Marianne Creatables Bauble and Bell die, and then the gold one was done using the circle Spellbinder die, and then embossing it with the Cuttlebug Spiral embossing folder.  The frame and sentiment was done on the computer.  Final touches was some peelcraft strip for the threads and a couple of ribbon bows.  


The next one was also very quick, some christmas designer paper for the background, the poinsettia is done with the Marianne Creatables die that I made the cards in my last post with. Finishing touches the ribbon and the sentiment.  


The final card is done with a cut out oval in the front of the card, that was done with the spellbinder oval die, and then I embossed the front with the Craft Concept Festive Tree embossing folder.  The ribbon down the side, was done with the Martha Stewart Doily lace border punch, some holly paper and gold ribbon.  The bell is the other part of the Marianne Creatables Bauble and Bell die that the first one was made with, but I have attached it on the back part of the card, the peelcraft strip is also on the back but I have attached the ribbon on the top of the oval and edged it with  some more peelcraft gold strip.  
This Photo shows the bell at the back better.  

Tuesday 8 November 2011

Christmas Cards

I can't believe how quickly the year has gone, and it seems to be on a headlong charge to Christmas!
I thought I had better get into gear and make my Christmas cards for this year, I like to make something new each year, so that I don't go giving the same card to the same person.  I have bought two new Marianne creatable dies this year.  The first is the Poinsettia LR0122.  I love this die, and think they come out really well.
I have made two cards with this die, the first is with two different embossing folders.  The background one is a Universal folder called 'Happy Holly' and the one with the poinsettia is a Cuttlebug Embossing folder called 'Snowflakes'.  The Holly leaves behind the poinsettia are the Spellbinder shapeabilities Foliage collection, and I used the rose leaf, but then cut around the edge to resemble holly.  Then some organza ribbon and three crystals for a little bling.  I also glued about 5 small gold beads into the centre of the stamen centre.  


The second card I did with the Poinsettia Die was this one that I did with white and gold.  I did the background with the Craft Concept embossing folder 'budding vine', and at the bottom is the cuttlebug Winter borders, with the snowflake one, and then scored some lines between the two for the ribbon to go, with my Martha Stewart Scoreboard.  I then did the sentiment with the Spellbinder fancy tag 2 die. I sponged gold ink around the edge of the card and sentiment.   A bit of gold ribbon and some gold foil paper for the stamen and leaves at the back and that's it finished.


The last card I have done with the other new Marianne creatables die called 'Clock and Bell Bauble'.  I cut three of the dies out of blue paper and stuck them to some silver foil paper, then cut around the edge.  I then scored them down the middle and folded each one in half and then glued three of the halves together to make the bauble three dimensional.  The background is again done with the 'Happy Holly' Universal embossing folder which I embossed with a frame so that it left the middle part blank. Some fine blue and silver ribbon and the Spellbinder Fancy tag 2 die for the printed sentiment.  I have lots of ideas to use this bauble die and the bell one that came with it, so I will work on those and show you when I have something finished!  

Thursday 20 October 2011

Silver Wedding Anniversary Card

Two weeks after we got back from our big trip, we celebrated our 25th Wedding Anniversary.  I made my Husband this card for it.  


It is a 'Bookatrix' card made with a template.  I have alternated the layers with a white finely patterned card and a holographic silver card.  The heart is cut out of the top layer so that you can see the underneath layer.  Each layer is trimmed with some Peelcraft strips.  The verse was printed on the computer.  The ribbon bookmark has a pearl buckle and pearl bead.  


The flowers are silver and white roses with the white one has some silver glitter on the edge.  The leaves are punched out of several green papers.  There are little daisies with pearl centres and pearl beads threaded on nylon poking out of the arrangement. 


I made a box to match with the heart I had cut out of the card, edged with some of the hologram silver paper a bow and peelcraft frame.  

Mediterranean Road Trip and Cruise

As you can see, it has been a while since I have done a post on my blog!  I have been busy preparing for our big OE.  I have never been further than Australia, but we set off to do a road trip firstly in the Italian Riviera region - Rapallo, Portofino, Cinque Terre.


From then up to Lake Como.  From there we travelled to Venice where we picked up the cruise on the Holland American 'Nieuw Amsterdam' Ship. 


From there we went to Dubrovnik Croatia, Corfu, Kefelonia, Santorini, then over to Catania Sicily, then Sorrento and Pompei, Rome.


From there we went to Florence and Pisa and then over to Barcelona Spain.  We had an absolutely fabulous time and saw some amazing places.  

Friday 8 July 2011

Mauve Parisian Cards


I have made a couple of Mauve cards using the same mauve and white daisies I had made with a variety of sized daisy punches. 

This one I used a K.Kingdom Embossing folder that came from Fat Cats Card Corner called 'Leaves and Butterflies' (sorry it is not easy to see in this photo!). The centre pendant is made with a mauve layer that is a scalloped circle nestability, then the frame is made with a combination of the small corner on the Parisian Accents (same as the mauve top corners) by Spellbinder and also the centre pendant in white. Next is a square of mauve and finally another of the Parisian Accents centre pendants in white. On top of that is the daisy and some daisy buds made with the daisy punches in 3 different sizes and some punched leaves.  Finally at the bottom is some ribbon and lace and a mauve parisian accent tag with a white circle nestie with a little bling. 


The second card is similar but a little simpler, this one has two different sized daisies with the buds and punched leaves.  I have used the same Parisian Accents tag with a circle nestie, and then cut the numbers out of some glitter card. 


I have used embossed white card with Swiss dots and the bottom is a designer paper and the Parisian Accents border die.  
 

Red Sweetheart flowers


Goodness, I hadn't realised it has been quite so long since I did a posting!  I have been quite busy at work and so have been coming home tired and not feeling like doing much in the way of crafts.
Anyway one of the cards I have made recently is this white and red and silver card with some Sweetheart flowers that I learnt from Angie at Penny Flowers, who created them to dedicate to her Mum that passed away.  

Here is a closeup of the flowers.  I have used a Craft Concepts embossing folder called Budding Vine for the background, Cuttlebug vintage corners and Spellbinders Fancy Tags 2 behind the flowers.