Free background from VintageMadeForYou

Saturday 21 November 2015

SW challenge

Hello everyone
A group I belong to called ''Pennyflowers'' have been doing a challenge for those that wanted to, on making an opulent card with Sue Wilson die cuts that our leader Angie had sent out to us.  We didn't know what we were going to get, all we had to do, was tell her what our favourite colours for cards were, and what if any of the Sue Wilson dies we had ourselves, so that she didn't double up on anything.  Well a wonderful packet arrived in the mail, and in it was these lovely pavo gemini border dies some cut into cream or mauve card, and some cut away as separate pieces, a whole packet of the beautiful open and complete Camellia petals from the finishing touches collection, some laurel leaves also from that collection, and a lattice and lace striplet die cut and backing piece, and some bow pieces.  So there is quite a few die pieces to make a variety of cards.  I decided to go with the pavo gemini die pieces that were cut into the cream card, as she had also included a mat piece in the mauve as well.  I wasn't sure what I was going to do with the middle part of the card, as I wanted it to be beautifully opulent as Sue Wilson cards are, so I finally decided on doing the background from the Austrian collection, as I already had it, and thought it fitted into the size of the card very well.  I decided I needed to do some paper piercing as all Sue Wilson cards should have, but there wasn't enough room with the mats that I had, but I did have room to do them top and bottom of the background die, so I decided to do that.  I coloured the centre of the complete camellia flower dies mauve and then put the open petals on top to add some lightness and delicacy. Finally I made one of the paper bows that also came with the die cuts and put it into the bottom corner.  Some pearls to finish it off.


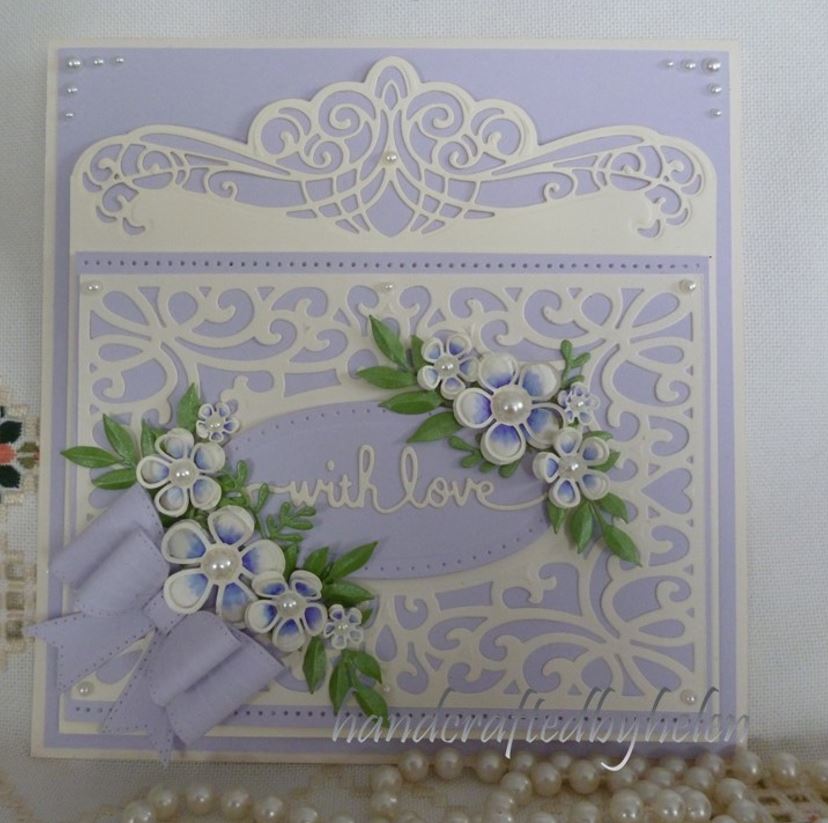
I hope Angie is happy with what I have made, you never quite know what someone has in mind when they set challenges like this.  I love it, and am very happy with it.  
  

Wednesday 14 October 2015

Bella's Party Card

I have another digital stamp that I have coloured.  This one is from makeitcrafty.com, I love their images.  


This one I have coloured with Reno Art alcohol markers, and have sponged the edges with a pink versa color ink and then mounted it on to a frame I have cut out with my Silhouette Cameo.  I have mounted it on some pretty Doodle bug paper.  With a scattering of sequins and tiny pink starts and a sentiment from an Altenew stamp set.  


Saturday 10 October 2015

Girls Coloured with markers Cards

I have been taking an interest in the craze at the moment of adult colouring, but decided to have a go at some of the great digital stamps of girls that are available instead of the colouring books, and if they worked out, I would use them for some girls cards. I thought it might be useful to maybe put a number on the card and use for when my Niece and great Nieces are having their birthdays.  
I have been studying how to colour things like the hair, faces and folds of clothing by watching some amazing videos on Youtube. Some of the Sherri Baldy Colorology ladies and how they colour the Besties, how Zoe from makeitcrafty.com colours some of her images, and also people like çraftybits, Elisabeth Sarkis and many others that show how to colour images.  There are tons on Youtube. They are so helpful and so I felt confident in giving it a go. 

I purchased some digital stamps and away I went.  The first one I coloured, was this one which isn't actually a digital stamp but a free colouring page of a Moxie Girlz page.  I wanted to have a go and something that wasn't too challenging as far as the clothes went, but had some nice hair to colour.  


 This next one is a Saturated Canary one, that I kept seeing on Google images as a coloured digital stamp and loved it.


This last one is a ''Bestie'' image from Sherri Baldy, I love these, and ended up buying a few of these digital stamps. as they are so cute with such gorgeous big eyes.  So I will have a go at a few more of them.  I loved doing the layers of her dress and her hair, and I thing this ended up being my favourite. It is so much better in real life than it looks in the photo.


I have really loved doing these. and will definitely do more. 


Friday 28 August 2015

Christmas card trio

I was having a play and doing some Christmas cards trying to decide which might be good for doing as my send out this year.  I love making shaker cards, so I decided to have a go at a couple.  The first two are what I came up with.  


I saw a card on pinterest that had been done by "created by Debbie 4000" and loved how she had created the snowy scene for her shaker card, so decided to case it (I hope she doesn't mind) but use the tree dies I had (Leanne Creatief  pine tree dies). I put some glue along the edges of the trees and stuck some creative expressions glacial ice on it to resemble snow. I used the Memory Box stitched square dies for the shaker part.  The Sentiment is the Kaisercraft Clear stamp set Mistletoe. 


This one is from a die I had used for Christmas cards last year, and thought it might make a nice shaker card.  It is the Cottage Cutz Nativity Ornament.  I made the shaker part by cutting out a circle in the front of the card with a nestabilities die which was exactly the same size as the outside edge of the ornament die, and put a strip of acetate behind it. I stamped the sentiment with the Merry Christmas sentiment from the Kaisercraft Yuletide clear stamp set.   I put fun foam behind the front.  I put a strip of silver and white diagonal striped washi tape down the left edge of the base card for the silver and red card. I made a strip by stamping some waste card with a flourish background stamp by Impression obsession and embossed it with a gold sparkle embossing powder and attached it to the left side of the gold and green card.  Before attaching the front of the card to the back, I put a strip of thin ribbon from the top of the acetate to the top of the card edge, and stuck it down behind.  I then filled the shaker part with red sequins for the silver card, and green for the gold card, and then stuck down the top part of the shaker.  (You can't see many of the green sequins in the photo, but they are there!)  Finally I stuck the die cut of the Ornament die down over the acetate to complete the card.


This last one is a bit different.  I have started liking 'CAS' (clean and simple) cards more and more. This one is using that philosophy.  

I have made a wreath design on the front of the card by drawing a light circle and then filling the edge with various sized gems to make as close to a circle as I could ge.  I then cut the front of the card with one of the edge dies from the Spellbinder A2 scalloped border die set.  The Merry Christmas is a die from Cheery Lynn, but I cut of the snowflakes as I wanted it plainer, with just the script writing.  I 
put a strip of Christmas striped paper along the bottom of the card base, added a string of gold thread from the wreath to the top of the card topper, and mounted this part on some fun foam to give some dimension, added a tiny bow with the gold thread as well to finish it off.  

Art Deco Wedding cards

 A couple of months ago I made some Wedding cards from the Debbie Moore Glitter and Glitz Art Deco Wedding CD Rom.  I mad quite a few, as it is such a great CDrom, so I thought I would show you about 3 of them.  I just did a pile with different combinations of the accessories that come on some of the printable sheets and with different colour combinations.  There is a huge range of choices.  

This one is the bride and groom decoupaged and then put onto one of the backgrounds available.  I used one of the backing papers, strips and sentiments available.  


This one was one of the stepper cards, that the template was on the CD rom.  The topper was quite big, so I thought that it would work quite well as a stepper card.


This is another decoupaged card which the frame and picture coming all in one, that just had to have the decoupage done and then use one of the backgrounds and a sentiment.

They are so easy to do, and so pretty and effective.  I was very pleased with the end result, and the beauty of it, I can go and make more at any stage, just print off more of the elements.

Friday 15 May 2015

Shaker card obsession

I am a bit obsessed with Shaker cards at the moment, I did a couple of Christmas bauble cards last year, and they were a big hit, so I thought I would have a go at some for Mother's Day recently, and a couple for my niece and nephews birthdays coming up.  

There are tons of really great you tube tutorials available and Jennifer McGuire and Kristina Werner are two of my most favourite You tuber's so check them out, as they have some great tips.  


This first one I got from a card I saw on pinterest that was pinned from http://bellalistona.blogspot.co.nz/2014/04/pretty-pink-posh-sequin-shaker-blog-hop.html which I saw, and liked how she had done the butterfly trail, and the simplicity of it.  So I made this card using two Memory Box dies I had.  The butterfly trail is made with a glitter gel pen, the sequins are from a craft store called 'Spotlight' and the sentiment is done on the computer and cut out with a die.  A few flatback pearls in a couple of sizes to finish it off.


This card is inspired by a card I saw, also in pinterest, done by Barbara Anders from My Favourite Things.  She had used some other balloon dies, but the ones I have used are Paper Smooches large balloon dies.  The Shaker section was done with spellbinder nestabilites circle dies.  The 'happy' is also a paper smooches die from the Christmas Word 2 die set.  The birthday is from a clear stamp set by Kaisercraft called 'Save the Date'.  Some sequins and stars in the shaker part, which has been mounted on some fun foam.  String to make the balloon strings and a card suitable for children. 


This last one is a card I have made from quite a few cards I saw on Google images, but a lot of them have the shaker part of the rattle made into a shaker by using a dome type thing.  I didn't have access to one of those, so I ended up making the circle shaker part like the balloon one above, into the white embossed card and then using a cutting file that I got from the silhouette store to make the rattle which I made the size to go over the circle die cut.  The embossing folder is the sue Wilson pinpoint floral brocade, and then the scalloped borders top and bottom are done with the spellbinder A2 scalloped border die set.  

There are countless ways to do shaker cards, I have lots more ideas, especially Christmas ones, which I plan to have a go at later in the year.
 

Saturday 18 April 2015

Vintage Rose Birthday cards

I haven't posted cards for quite a while, I haven't actually been making much in the way of cards.  I have been doing other crafts, I have been having a go at doing some mixed media canvases, which I have loved, and it has been a great break, and I have come back to card making zinging with ideas.  

I have been feeling like getting into a bit more stamping, as I have moved away from it lately, and do a lot more die cutting.  A few months ago I purchased the stamp set called Vintage roses by Altenew.  This is a stamp set where you build up the rose in layers using a progression of inkpads from a light shade to a deeper shade.  Now I don't have many inkpads, and here in New Zealand there are not a lot of choices in things like the shadow inks and pigment inks in colours.  A only ones that seem to be available are the Tim Holz distress inks or just the black stamp pads in various different brands and versamark, or I can buy the Brilliance ink pads but they only seem to be available in pearlised colours which don't seem to be suitable for this method.  Anyway I did manage to put together a selection of pinks and mauves, but I have struggled to find yellows and blues in the right shades to do these roses.  I will keep hunting and trying to come up with some.  

Now I also have to say, I didn't find it very easy at first, doing the stamps on top of each other, and getting them lined up, I kept throwing attempts away, until I managed to do some I was happy with.  There are some great you tube videos to watch on others using them, which were very helpful, as there were some that did them in a different order, so eventually I found a method that worked for me.  Another thing I seemed to do quite often was I would somehow get ink somewhere else on the card I was doing my arrangement with. I think it was from my acrylic blocks, as I only have about 4 blocks and some of them were quite big, so not very suitable for doing this method.  So for those ones that I had got ink somewhere else on the white card, I have had to strategically place some sequins or have had to cut them out and mount them on another piece of card.  Anyway, I got some I was happy with.  

So here is two cards I have made with a selection of pinks to plum, and mauve to purple.  


This one I did an arrangement of roses in different sizes on one piece of card, and then stamped some more randomly on a strip of scrap card, so that I could create this border.  Then some strategically places sequins and clear gems to bling it up a little.


This one I have done two strips of the roses and leaves stamped randomly, and then I have cut a central panel with two of the spellbinder A2 scalloped border dies, a piece of pink ribbon going through the centre, and finally the sentiment done on the middle die of the Spellbinders Radiant Rectangles die set  A few pearls to finish it off.  It has made such a pretty card.  

I love this stamp set, I love all things vintage and flowery, so this combines it perfectly.  I would love to get some more of the Altenew stamp sets, as they are a little bit different, but it is so expensive to have them sent from America, the international postage is very prohibitive.  I will have to wait and see if I get some money for my birthday, and I might treat my self to another one!  Here's hoping!!

Saturday 21 February 2015

Some more special Birthday cards

Carrying on from the last post, I am also trialling this new design, to see how they will go for popularity.  I have again, done one for display purposes, and then left two cards in different colour options, that I can make to order.  

These ones I have used the Spellbinder Radiant Rectangles dies, these are one I really love, and definitely a 'go to' die for many cards.  I have used various digital papers, again flowers I have made and then contrasting ribbon and pearls.  I have done a border around each of them with the pearl PVA by creative expressions.  


I made a box for each and used the same die for the aperture.


I think the middle one is my favourite, so pretty with the pop of darker colour with the ribbon.  

Thursday 19 February 2015

Special Birthday cards


have been having a session on making flowers, to build up my stash, and decided I needed to use the Seville die from the Spanish Collection of Sue Wilson dies, that I purchased part way through last year, and hadn't really done much with.  

I love the cards Cristina Griffiths from 'flowers ribbons and pearls blog' makes and so decided to make some cards similar to the ones she did with the Seville die, but to use the flowers I had made.  I have made 4 different colour ways, but kept 3 of them blank, so that I can make them up as requested, and one made for a special birthday, so that I had one finished, to show people. 


So the are pretty much the same as each other, other than different colours behind the main die.  I have made a box for each one, and have done the Seville die, without the outer die (which cuts it away from the card) so that the die stays in the card for the lid, and then lined it on the inside with thick acetate.

These are the other three colour combinations, the purple I have done like the burgandy card, the pink and yellow I have used glitter card.


I love how the flower arrangements have turned out, I used some loops of either gold or silver fine cord, poking out from behind the flowers and foliage.