Free background from VintageMadeForYou

Tuesday 23 August 2016

Trio of scrunched flowers card

I have made a card and video using some flowers I have made using the scrunching method, which makes them textural and quite strong.


I use coloured photocopy paper for these, just 80gsm weight, you could use a slightly heavier paper, but I wouldn't go any higher than about 100 - 120gsm otherwise I think it would be difficult to get the folds and volume. I think even 120gsm might be pushing it. 

So what you do is cut out some die cuts, or punch out some flower shapes, and really it doesn't matter which you use, or even what shape the petals are.  The end result will vary depending on what shape you use, and the more petals there are in the flower shape, the more work it will be, so a good one to start off with is a 5 or 6 petal flower.  Generally I would use two sizes and I cut 2 of the outside petals and two smaller petals.  If you flower punch or die has narrow petals you may need to do one or two more of each layer. 

Then I lay them out on a paper towel and spritz them with a little water, turn them over and spritz them again, you want them damp but not sopping. Then wrap each petal over the barrel of a pencil or pen, or even a handle of a paintbrush (not too thin) and then holding the petal over the shape of the pencil/pen, you take your fingernail and push the outside edges of the petal towards the middle, mostly it will concertina, but it may scrunch as well, that is OK, and press so it keeps its scrunched shape. Once you go around all the petals, put the flower aside and do it for the rest.  Allow them to dry, and then if you want, you can pull the petal out a bit, so it isn't so tight.  Turn them over so the curved shape is facing down, and I shape them a little with a ball embossing tool, to shape the middle of the flower a little, this also helps to turn the flower up a little at the ends of the petals.  Then it is simply a matter of glueing the petals one by one on top of each other, working from the biggest and then the smallest, alternating the petals so that it fills in the gaps between the petals.  Then you can stick something into the centre like a flatback pearl or an embellishment of some kind as your flower centre. 

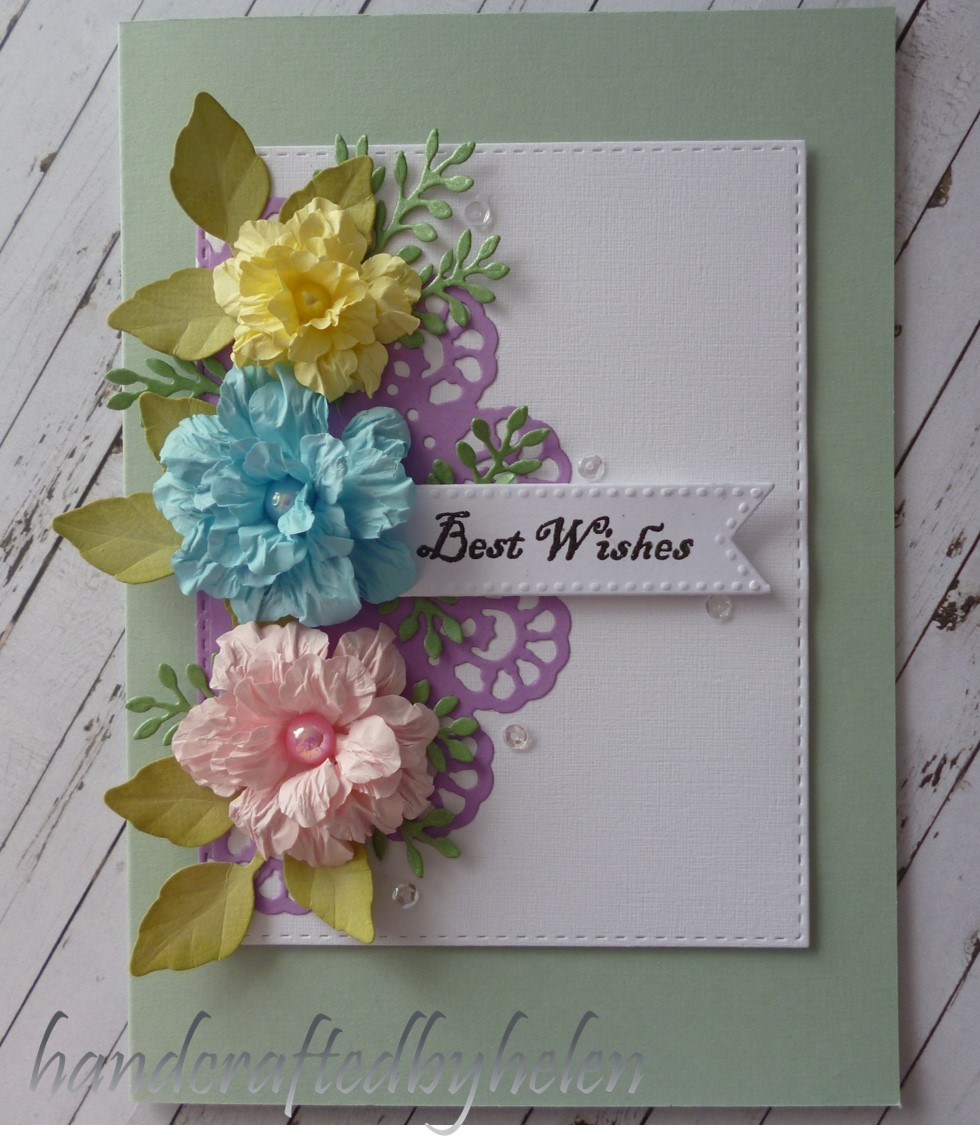
With my card I made two flowers with the same die cut pieces and the yellow one I wanted it a bit smaller, so I used the two smallest die cuts from the other flowers and then used a smaller die I had for the two petals at the centre, this changed the look of it a little, but not too much.  Just experiment with different shapes of die cuts and punches that you might have and you will get some very cool results.  You can also colour the centres it you want more colour to your flowers, especially if you are doing white ones, but I felt I didn't need to do that with this card, as I wanted some pastel but pure colours for it. 


Now to the card, I made a card base 5" x 7" out of 'Hazel' Bazzil card, and then cut out a doily die cut out of Mauve card.  I glued the doily onto a piece of white linen card and then cut this out with a stitched rectangle die leaving a little bit of a white space on the right hand side, so in essence it is half a doily but it has the stitched border all the way around, and put that onto my card base with some fun foam to give a bit of dimension. 

Then I just glued my trio of flowers on top of the doily at the edge, tucked some leaves, which I had cut out with a couple of different dies out of scraps in a couple of different shades of green. Finally I popped a few Pretty Pink Posh clear sequins in the 4mm around the arrangement for a bit of sparkle.  

Please check out the video if you would like to see the flowers and card being made


The supplies I used to make this card

Card base Bazzil 'Hazel' 5" x 7"
A piece of white card and mauve card
scraps of yellow blue and pink photocopy paper
Simon Says stitched rectangles dies
Kaisercraft Doily die
Spellbinders foliage die set
Sue Wilson delicate fronds die set
Cheery Lynn floral dies for blue and pink flowers
Cheery Lynn Cherry Blossom die for centre of yellow flower
halfback pearls in pink yellow and blue for centre of flowers
Cosmic Shimmer dries clear glue
Quilled precision tip applicator bottle
3M scotch foam tape
Joy Crafts Banner die set
Paper Xtra sentiment stamp set
pretty pink posh sparkling clear sequins 4mm
Scissors
Ebosser

I hope you have a go at making these flowers, the possibilities of colours and looks are endless.  You can sponge them with colour, you can put any embelishments into the centres of them and depending on what punch or die you use, you will get a different effect
I would love to see some of your flowers if you make some!

Happy card making everyone


Tuesday 16 August 2016

Another layered floral stamp card

When I was trying out some different colour combinations and stamps from the two stamps sets I used for the card in the last post, I ended up with some extras to use, so I have made a card with the spare stamps that were left over. 

The card layout is a very simple one, but I got my inspiration from a lady who has a blog called Random Acts of Creativity and did a card for an Altenew Blog hop and I loved how she had tucked some flowers at the bottom edge of her card, so I thought I would CASE her card.  So the inspiration is totally Iwona's.


I started off by making my own diagonal striped tone on tone patterned paper, but I ran into a snag, because the MFT bold diagonal striped background stamp is only 6" wide and I usually do my cards 7", so I had to come up with a way of extending the stamped area.  I did manage to do this, so see the video below of how I did it. 

The top panel with the sentiment has a strip of the pretty Tim Holtz Deco paper at the bottom and then was raised up on some Scotch foam tape to give it some dimension.
Then it was a matter of playing around with the stamps of flowers and leaves that I had fussy cut out.  Once I was happy with the result, I used some Press 'n Seal to keep the grouping together while I glued the flowers and leaves that I wanted as my base layer, and then put all the other flowers on with foam tape again to give the arrangement some dimension.  Lastly I tucked a leaf and flower under the left hand edge just under the sentiment like she had, and that finished it off. 


I have seen this layout done countless times, but I hadn't seen the little sprig tucked under the opposite side of the card like on Iwona's card, which in my opinion make all the difference.  I don't usually CASE cards quite so similar to the original, and I hope she will forgive me, but it is such a simple but pretty layout.  I did contact her, to ask permission and she said it was Ok, so I thank her for this. 


The supplies I have used for this card are:
Altenew Peony Bouquet Stamp set
Altenew Vintage Flowers stamp set
MFT bold diagonal Background stamp
Die-namics Stitched Oval scalloped frames dies (largest)
Altenew Crisp dye inks, Frosty pink, cotton candy, coral berry, ruby red, grapevine, buttercream, warm sunshine, caramel toffee, frayed leaf, forest glades, evergreen
Versa color Hyacinth, Violet
Un-named pigment ink pad Mauve
Adirondack dye ink pad Denim
Archival dye ink Sepia
Versafine Onyx black ink
Craft foam
Card base 5" x 7"
Card front panel
small piece of light pink card
Craft foam
Tape runner
double sided tape
Scotch 3M tape
scissors
Ebosser


Handmade enamel dots in pink and mauve

I hope this card has given you some inspiration, Happy card making


Monday 15 August 2016

Graciellie Designs August blog hop Winner and Inspiration Blog hop

Hello, welcome back. I am popping in to let you know the Winners name from the Giveaway during the August Blog hop for the new digital stamps available at the Graciellie Designs Digital shop, that I was asked to be a guest designer of.  


There were some gorgeous new designs for this release, and a wonderful new coordinating digital black and white background paper pack also available. 


This paper pack is perfect if you print it out on a laser printer, so that you can foil it, like I did for the background of my card.  You can also recolour them in various computer programmes so that they coordinate with whatever project you are doing.


I was lucky enough to be given this digital stamp set to use for my card and here is the card I made with it.


The wonderful designers for Graciellie designs have come up with some more inspirational cards for this August release, so here are the links to their creations.


And the news you have all been waiting for .... The winner of the free digital stamp is
'Marty Fishman'
So Marty, If you haven't stopped by the Graciellie Disigns blog already, Gracie will have more information on claiming you free design there, and congratulations.

OK that's all from me for now, but come back on the 1st of September, as I have been asked to Guest design another card using a stamp from the new September release!

Bye for now and happy Card making


Tuesday 9 August 2016

Floral Layered Stamps Card

Today's card is using two of my favourite stamp sets (along with Vintage Roses and Persian motifs). They are layered stamps by Altenew and I love the results you get with them.


I started off by stamping the large flower and one of the leaves from the Peony Bouquet stamp set, and then two different roses and two leaves from the Vintage Flowers set.  In various colour combinations onto white card.

I cut them out leaving a small white border, and put them aside

To make the actual card, I cut out one of the scalloped oval frames (largest) out of pale pink card and then cut it out of a white card panel and then cut that down to fit onto my card base, but made it about 5mm smaller all around.  I backed this with craft foam, and cut out the oval centre, slightly bigger than the white aperture, so that it would support the pink frame I fitted back into the opening. 

I then took my card base and drew a circle of where the frame will sit with pencil as I intend to stamp some more flowers and leaves into this area and then my sentiment. 

I stamped two of the small yellow flowers and masked them off, then stamped a combination of two leaves around the flowers, so that they will look like they are poking out from behind the top bouquet of flowers. 


The sentiment was done by stamping each letter from the calligraphy alpha set, making sure I overlapped the tail of the previous letter with the down stroke of the next letter so they appeared linked like calligraphy. Then I rubbed out the pencil marks making sure I heat set the sentiment so it wouldn't smudge, and then glued the top panel on to the card base.  


Finally I played around with the cut out flower and leaves until I got an arrangement I was happy with, and then took the top flowers off, glued the leaves into position with tape runner, and then used scotch tape to raise the flowers slightly to give dimension. A few Pretty Pink Posh clear droplets dotted around and that's the card finished. 


Supplies I used for the card:
Altenew Peony Bouquet Stamp set
Altenew Vintage Flowers stamp set
Altenew Calligraphy Alpha set
Die-namics Stitched Oval scalloped frames dies (largest)
Altenew Crisp dye inks, Frosty pink, cotton candy, coral berry, ruby red, grapevine, buttercream, warm sunshine, caramel toffee, frayed leaf, forest glades, evergreen
Versa color Hyacinth, Violet
Un-named pigment ink pad Mauve
Adirondack dye ink pad Denim
Archival dye ink Sepia
Versafine Onyx black ink
Craft foam
Card base 5" x 7"
Card front panel
small piece of light pink card
Craft foam
Tape runner
double sided tape
Scotch 3M tape
scissors
Ebosser
American Crafts Paper trimmer
Pretty pink posh droplets 4mm & 6mm

I hope I have given you some inspiration to use the layered stamps in a different way or try an new layout for you next card

Thanks for stopping by and happy card making


Monday 1 August 2016

Graciellie Designs Bloghop and giveaways

My card today is part of the Graciellie Designs Bloghop for their August release of 6 new digital stamps and a special edition coordinating digital paper pack.


I was thrilled to be asked to join in with this bloghop as a guest designer, there are some gorgeous designs in this new collection, and the Special Edition coordinating Black and White digital paper pack allows you to Foil them if printed on a laser printer and also recolour them on a computer to whatever colour you would like for your project.   


For my card I have used the Thankful Lilies stamp set which has images of a lily, and lily buds and some really great sentiments.  


I reduced the size and then printed out the coordinating lily paper from the new black and white paper pack, with a laser printer, which enabled me to foil it with the Heidi Swapp pink foil, which is absolutely gorgeous!  It was impossible to get the full impression of this in the photos unfortunately

I mounted this onto a pink 6" x 6" card base and then cut a doily die out to go under my flowers.  I put a pink satin bow along the left hand edge and tied a bow with the same ribbon to go on top of it.  

I reduced the size and printed out the two flower images along with an extra one of the buds, and also printed out some extras of the flower petals, so that I could make the flowers more dimensional.  I coloured the digital stamps with the pink copics I had (A list of the colours are below in the supplies list). I don't have many copics, so I ended up using all the pink ones I had, these are probably not the best selection of pinks, you just use whatever markers you have.  It doesn't need to be alcohol markers, you could get the same effect with zig clean colour markers or even water colours.  


Once I had coloured all my images I fussy cut them out and then went around the edges with a black pen to tidy them up and take away any white parts from the cutting.  
I also cut out two of the garden branch dies to have behind my flowers for some foliage which I glued onto the doily just slightly overlapping the ribbon.  
I mounted the two sets of buds onto the top of the branch and doily dies using some foam tape at the top of the petals and glue at the base of the petals to give them some dimension. With the extra petals I had coloured and cut out, I mounted them onto the central petal of each bud with foam tape at the top and glue at the base. 
Finally I added the extra petals to the main flower also with foam tape and then glued the flower onto the middle of where the buds sat.  
Finally I put the sentiment I had also printed out onto foam tape and tucked it under the edge of the top lily, some pink dots and some clear sequins for a bit of sparkle and that is my card finished. 


Please hop along to the rest of the talented ladies on the bloghop, leave a comment on every stop for a chance to win a new stamp set of your choice and the new Black and White Patterns Digital Paper Pack. To give everyone even more chances to win, this time the hop is ending on Facebook for an extra chance at winning!  


The next hop is Lori here, and please don't forget to visit the Graciellie Design etsy shop to check out this new collection at http://www.etsy.com/shop/GraciellieDesign

The bloghop and giveaways will run for two weeks and Gracie will be announcing the winners on August 15 so check out her blog http://gracielliedesign.blogspot.com/

The materials I used for my card are:
White card for printing on a Laser Printer
Pink card base 6" x 6"
Light green card 
Digital stamp set 'Thankful lilies'
Couture Creations Amaryllis doily die
Marianne Creatables Garden branch die
Heidi Swapp pink foil
Minc machine
Spun sugar distress ink
Mini distress blending tool
Pink satin ribbon
Copics: RV00 RV02, RV06, RV23, YG36
Renoart alcohol markers: dark pink 136, Green 30 and yellows 226 & 5
3M foam tape and a thicker foam tape
Theresa Collins Fiskars non-stick scissors
EK success Cutter Bee scissors
American craft paper trimmer
Glue dot
Cosmic shimmer dries clear glue
Precision tip bottle
Zig two way glue pen
Bone folder


I hope I have managed to give you some inspiration on using floral digital stamps in a different way.

Happy Card Making