I have made another card using the Altenew Beautiful day Stamp set.
This time I have kept it simple with some water colour done with distress inks.
The outline stamps of the large flower and leaves are stamped onto Ranger water colour paper with versamark ink and Ranger white embossing powder first then I used Wilted violet, squeezed lemonade and mustard seed for the flowers and a combo of bundled sage and mowed lawn for the leaves.
To finish off the card, I trimmed the card about a centermetre in from the edge with a craft knife, leaving the flowers and leaves, which I fussy cut around, and backed the panel with some violet card so it left a fine border around the cut areas, and the leaves and flowers overhanging this slightly. This was then stuck onto a black card base.
I have made my first card using the new stamp I have just got called Beautiful Day by Altenew. It is such a gorgeous stamp.
I did the stamping of the main flower in the set and the leaves using the pink and green sets of Crisp ink cubes from Altenew, but I coloured the smaller and longer flower stamps with copics and other alcohol markers I have. I then did a partial cut of the circle die, so that I only cut an aperture up to the flowers, and then fussy cut around the bouquet .
I have made a panel to go behind the aperture using a stencil and some gel medium mixed with some sparkle glitter. This is great, because when it dries, you only really see the glitter and not the medium.
The sentiment was done with the Altenew Calligraphy Alpha stamp set and then fussy cut out.
I am really please with how the card came out, I wanted a soft look with the flowers. I am sure I will be using this stamp set a lot!
Here is a video on the process of making the card.
Do you ever have days when you are making cards that you make lots of mistakes and you begin to think maybe you should not be making this card! Well this was one of those!
I started out making a frame with some stitched square dies, and then proceeded to stamp out a scene with the hills and fence stamps out of the set. I then masked off the hills and created a sky with a freehand made mask of clouds and tumbled glass distress ink. I then used the negative parts of my mask and masked off the sky and proceeded to ink the hills with twisted citron and mowed lawn, that's when I discovered my first mistake, I had used versafine onyx black ink, when I should have used memento tuxedo black ink which is waterproof, so the ink on the grassy parts started smudging. So I took great care not to rub that too hard.
I stamped out the two sheep, a couple of trees and the little flowers, and decided to fussy cut them out right to the line, so that they looked like part of the scene. But when I came to do the flowers, they are so tiny, when I tried cutting around the stalks, they fell apart. Luckily I was able to glue them back together when I put the scene together. So then I decided I wasn't going to fussy cut out the sheep with the balloon right to the line, as it would be impossible with the balloon string, so that one I left a small white border.
The next mistake was even though I used my misti, I still managed to get my sentiment crooked! I always seem to ruin my cards lately when I add a sentiment (maybe I will start making cards without sentiments LOL) That is why I added the two gold hearts (diecuts from another project) so that hopefully they distract the eye a little away from the sentiment.
I had also drawn a line around the square die, so I knew where to stamp and colour the scene, but I forgot to rub the pencil out before inking the sky, and you could see the line through it. My fix up, was to lower the frame on the scene a little, but then the stitching at the bottom of the scene showed from cutting it out with another square die. So that was why I used the grassy border die, to hide that. Phew!
The rest of the card went fine, the scene came together OK in the end, and it turned out to be quite a sweet card.
One of my favourite stamp companies is Altenew, and they have a video challenge going on where people can submit videos on why they love Altenew so much.
I have done a couple of videos to enter the challenge.
I started off card making because of discovering stamping, and especially the heat embossing, it is such a magical thing. Through the years I had moved away from stamping, I might stamp the sentiment, but that was sometimes all I stamped on a card.
Then two years ago, I saw a stamp and some cards made with it, on pinterest, it was the Vintage Rose stamp set my Altenew! I fell in love with it and just had to have it. It cost me a fortune with the postage from USA and the exchange rate, which wasn't good at that stage. Anyway I bought it and absolutely loved it.... and that was the return and love of stamping that I have now.
So here is the video
Altenew is such a innovative company, combining old ideas with a modern twist. They produce stamps that are quite different than any other company, including sentiment stamps in other languages. Not many companies do that. But their layered stamping system is unique and takes stamping to a whole new level, they look so professional and amazing!
I think my cards have also moved to a whole new level because of these stamps.
They also produce some fantastic inks, and they sell them in colour families, so if you want to do a particular colour for your flowers, then the ink colours are there for you, starting from a pale shade, right up to the darker shades for the darker layers of the stamp. A well thought out product, and they keep doing this.
Their latest product is some kits for doing particular types of cards like wedding invitations or thank you cards, these have all the products and instructions you need to make the cards including the card blanks, envelopes, stamps, inks and ideas sheets. What a fantastic idea!
I look forward to seeing what they produce next.... I can't wait!
Sometimes when I make cards, I have an idea in my head, I make the card and mmmm it is Ok but nothing startling, and sometimes you make the card, and its wow that turned out better than I thought! Well this card is a bit like that, I think it turned out better than I saw it in my head, I think it is the blue and yellow together!
I started by making daisies in a range of colours, which if you make them with 120 - 160gsm card they turn out to be really quite strong for your cards.
I decided to make a variety of cards with different colour combinations, so I started off with sponging some stitched rectangles with Distress inks in a variety of colours that complimented the daisies I had made.
I set to and made one on video and then some other colour combinations.
Here is the video on how I made them.
The Supplies I have used to make these cards are:
Couture creations Intricutz die called 'Falling blossoms'
(but you could use any daisy dies if they have a variety of sizes)
Elizabeth crafts Designs 730 Curvy leaves dies
Cheery Lynn Sweet Christine die strip
Simon Says Stamps stitched rectangle dies
Paper Xtra sentiment stamp set
Altenew Crisp Inks: Arctic, Carribean Sea, Persian Blue, Soft Lilac, Lavendar Fields, Deep Iris.
I hope you enjoyed the video and maybe got inspired to make some of these daisies and smaller flowers. As I said they are surprisingly strong once made, and are so pretty on a card.
Hello, I was asked again to take part in the September Blog hop which is to celebrate a mini release of a selection of digital stamps that compliment the present fall collection.
To be in to win a digital stamp of your choice, just leave a comment on the blogs as you hop along.
The design I was given was this beautiful poppy image and the lovely digital sentiments, and this is that card I made
I coloured the 4 of the Poppy images in with Copics and then fussy cut them out, using different parts of the image, so that I could make the poppy three dimensional. I was rather pleased with how it turned out
I used distress inks antique linen, twisted citron, squeezed lemonade and mowed lawn to blend a background, then put some water droplets to slightly distress the look, then put an inked script background stamp over it all, making sure that it was a bit distressed looking as well.
I made a frame with a stitched rectangle die, for the centre, and the paper smooches stitched border dies around the outside to continue the stitched look.
The sentiment was printed out using one of the digital stamps available with this set, and then used a little ink in the twisted citron and the antique linen to colour the two ends on a diagonal and made it into a banner. Both the banner and the frame were raised with some foam tape to give it a little dimension.
And that is my card finished.
Here is a video of how I made the flower and card.
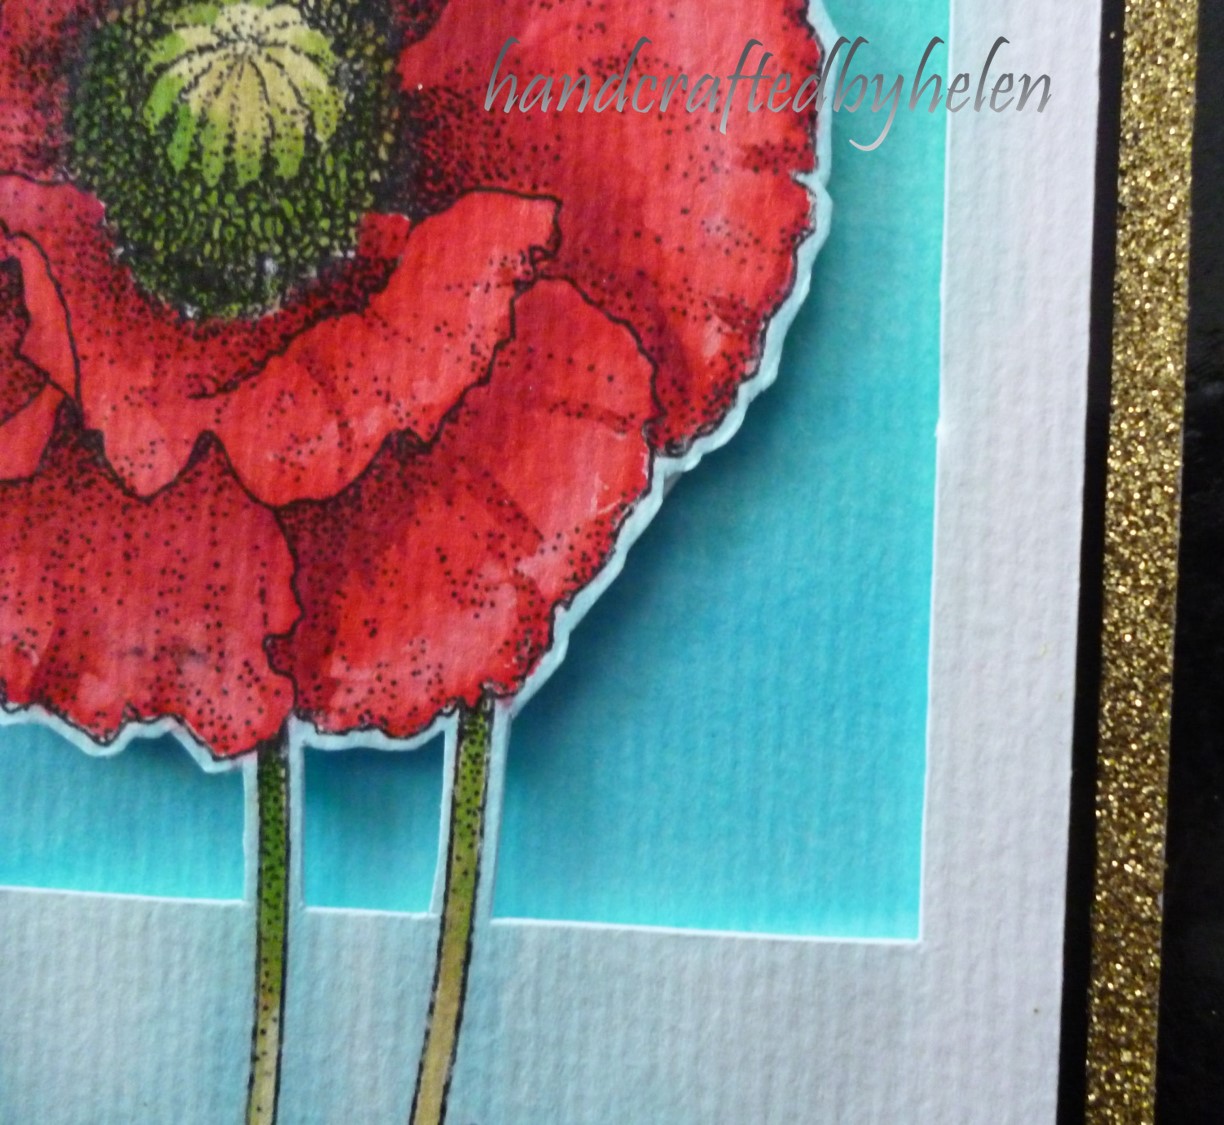
A second card I have made using the same digital stamp, this time I printed the image onto some water colour paper that would go through my printer, I have also printed the sentiment 'Best Wishes' under the image.
I water coloured it this time using distress inks, so I used abandoned coral, candied apple with some fired brick for the darker areas, and I used shabby shutters and mowed lawn for the stalks, buds and leaves.
I started by doing a wash over the entire picture with the abandoned coral ink and the shabby shutters ink and left that to dry.
I then used the candied apple and the fired brick to build up some dimension on the flower and some stronger colour of the shabby shutters and the mowed lawn on the foliage.
Finally I went around the image with a light wash of tumbled glass to make a shadow, or halo around the flower and foliage, so it would 'pop' from the page and not look so flat.
I then cut an aperture out around the poppy flower leaving a small white border around the actual flower, so that I could put a bit of a water coloured background behind the main part of the flower. This I did with peacock feathers, salty ocean, evergreen bough & mermaid lagoon distress inks.
Then I put some foam tape behind the poppy and the frame and the rest of the card below the frame, so that I could pop it up a little on the card base, that was a little wider than the flower panel. I put some gold glitter tape down both sides of the card base, so it poked out beneath the flower panel, just to brighten it a little and that is the card finished.
Hopefully this has given you some ideas of ways to use digital floral stamps and especially the gorgeous ones form Graciellie Designs. Do go and check out the selection of stamps available, I am sure you will find one you will fall in love with! Remember to add a comment to each of the blog hops along the way to be in the draw for a free digital stamp and the next stop on the Blog hop is to Lena.
Thank you for stopping by on the Hop and thank you for persevering on such a long blog this time.