Free background from VintageMadeForYou

Wednesday, 31 May 2017

Floral wreath card with Wplus9 freehand florals

For some time now, I have been wanting to have a go at creating a wreath with flower stamps, and thought I would have a go with the Wplus9 freehand floral stamp set I have just purchased. One of my longest followers of my blog Carol, suggested this stamp quite some time ago, and I have had it at the back of my mind to get it some time, and finally decided to add it to a purchase I was doing.  I am not sorry, it is a lovely stamp and very forgiving with the positioning of the layers.  


I ended up making two colour versions.
I cut a circle in masking paper and stuck it onto a card panel, and then stamped the large and next rose in a rough triangle, masking them if necessary, and then did another triangle with the leaves, then used the sprig and lilac stamps as fillers for between the other stamps, and finished it off with stamping some of the tiny roses in blue on the sprig.  Then I peeled off the central mask and that left the wreath shape.


The sentiment I cut three of the 'wishing' die out and glued them together, then stamped a complimentary stamp under it for each card.  


I embellished the blue version with some sparkling clear sequins.


I embellished the pink version with some nuvo crystal drops in the Carnation pink gloss.  Each one was mounted onto the appropriate coloured card base.  

Here is a video of me making the pink version.

The supplies I used for these cards was
Wplus9 Freehand Floral stamp
Altenew Crisp mini ink cubes.
Frosty pink, cotton candy & coral berry
Frayed leaf & forest glades
Buttercream, warm sunshine and paper bag
Soft lilac and lavender fields
Arctic, Caribbean sky & Persian blue
Cottage cutz circle die
Inkadinkadoo stamping masking paper
2 card panels cut down to 12.5cm square
Two card bases 14cm square
Scrap card in both colours
Versafine onyx black ink
Ranger clear embossing powder
Heat tool
Misti
EK success tweezers
Simon Says Stamp Wishing die
Simon says stamp sending and wishing stamp
Nuvo crystal drops Carnation pink gloss
Pretty pink posh clear sparkling sequins in 4mm & 6mm

I hope this inspires you to have a look at what flower stamps you have and if you can do something similar with what you have. You certainly don't need this stamp specifically to do this layout.  


Wednesday, 3 May 2017

Molded butterfly card

I had a wonderful surprise the other day, I was contacted by http://blog.feedspot.com/cardmaking_blogs/ to say I had made the top 100 Cardmaking blogs on their site. It was a lovely surprise, especially when I see who else's blogs are in the list. I am in good company! Do check out the link to see the other cardmaking blogs.

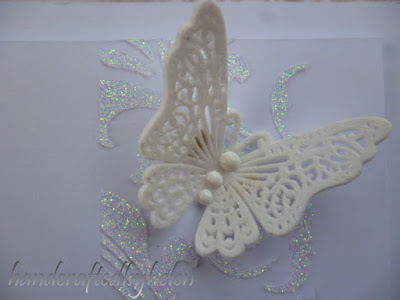
I have recently discovered a way of using cake decorating or Sugar Veil molds and mats to make lace for my cards. 
I discovered this by coming across a lady called Colleen from her you tube channel called 47CMC.  She had been experimenting with all sorts of products from modelling paste to DIY caulking.  So I bought a few molds online and had a go, with a variety of success, but overall I think they are wonderful.  I will be posting a video at my youtube channel on what products I found worked best for me, but in the meantime this is about using a butterfly mold, some molding paste, and I made a card using the result. 


This is the mold I used and I used some Golden light molding paste, (although any flexible moulding paste would probably work), I spread it on to the mold and scraped the excess off, and left to dry for 24 hours.  I then used some rubbing alcohol on a cloth, (or we call it isopropylene) and rubbed over the surface, which took away any, what is called 'hazing', or the remains of scraping off the excess.  Then I was able to carefully take them out of the molds and was left with some very pretty detailed butterflies.  I then sprayed them with some glimmer mist to give them a little sparkle.


To make the rest of the card I used the Flourish Tim Holtz stencil and some nuvo glimmer paste and did a panel up the right hand side of a card front panel, and put that aside to dry.

I then made a bow and tied it around the bottom of the card panel which I had trimmed down, securing it onto the back.
The panel was then stuck down onto the card base.  


Finally the butterflies were added to the front of the card along the stencilled panel with some foam tape. I then added some nuvo crystal drops on the bodies of the butterflies.


I have purposefully left off the sentiment at this stage as I am not sure how I will use the card, so I will add the appropriate sentiment at this time.  

Here is a video on how I made the card.


I will have a video shortly which will explain the different products I have tried with these cake lace molds, and some do's and don'ts using them.  

The products I used for this card were 

Butterfly cake lace mold
Golden light moulding paste
tattered angels glimmer mist
Nuvo moonstone glimmer paste
Nuvo crystal white gloss drops
Tim Holtz Flourish stencil
palette knife
foam tape
White seam binding ribbon
ribbon maker
Craft foam

I hope this card might have inspired you for a layout or ideas for your own card making.  You definitely don't have to do this molding to make butterflies for your card, you could just as easily use some die cuts.  But if you are anything like me, I love to discover new techniques and ways of making embellishments for you cards, so keep an eye out on my youtube channel for the video I am doing on making molded lace for cards.