Free background from VintageMadeForYou

Wednesday, 9 October 2013

Two blue Christmas cards

I get a bit tired of Green and red Christmas cards, so I have made two blue and white ones.  


The first one I have used the Leane Creatief Popco Winter stamp, this time using the whole stamp, inking behind each part with blue ink and colouring it with Tombow pens.  

I have used two different snowflake designer papers. mounted on light and royal blue card.  The snowflake border die is the Joy Crafts 3002/2021 and the hanging snowflake is a Memory Box Precious Snowflake die 98729 which I have done in glitter card. The embellishment is a couple of acrylic stars with glitter inside.  


This other one I decided to make a centre step card, as I thought it showed off the snowflake border die well.  I have used a snowflake designer paper behind them and they are just done with white card.  The centre part is the Marianne Creatables Petra's bridge die LR0276 which I inked with a royal blue ink.  The picture is a vintage Christmas scene.  

Both a little different for Christmas cards, I don't usually do snowy scenes and snowflakes for Christmas cards here, as we have Christmas in our summer, so we don't know what it is like to have a snowy Christmas like the northern hemisphere.  But oh well we can dream can't we!

3 card using one die differently

When I get a new die, I always try and think of as many different ways to use it as I can, sometimes different colours make it look quite different.  Or even thinking about the negative space or embossed or not can make it look quite different.  
I have done 3 Christmas Cards using a Leane Creatief Pine Tree die 45.8947.


This first one is quite a simple one, that I have die cut an aperture in a piece of card with the Marianne creatables Oval Frame Die LR0235 and used the outside scalloped part to put around the edge.  I also cut out one of the holly branches from the Marianne Creatables die LR0244 in white and wrapped it around the top of the frame.  I have raised this with foam strips, put a sheet of the Leanne Creatief christmas paper pack behind and tucked the tree die inside the space, but left a couple of the lower branches out the front, so that it gave it some dimension.  Before I did this, I decorated the tree with some red and white string and some tiny little gems to resemble Christmas decorations.  The star at the top is also from the Pine tree die set.  The sentiment is a Cheery Lynn sentiment die.


This one is done with the same pine tree die, but I cut out 3 of each of the sizes, folded them in half and glued one on top of the other down the central fold, so that it fanned out and made a 3 dimensional tree.  I have mounted these on some more from the Leane Creatief Christmas paper pack.  The Stamp is also a Leane Creatief stamp called Popco Winter.  I have coloured it with aquash pencils and Tombow pens and cut around the outside edge and glued onto the paper.  The star again is from the same set, which I have cut out in gold mirror board. 


The final one is all white other than the sentiment.  I have embossed the background with the pulled together Couture creations embossing folder.  I love this one, it is so versatile.  The trees I have cut and embossed in white card, and then I have put some crystal stickles on the bottom edge of each bough.  The bank of snow at the bottom is just a piece of a bubbles embossing folder.  The stars from the die set are done in white with the stickles on them so they are sparkly.  
Finally the sentiment is done with the same Cheery Lynn sentiment die and I have mounted it on the Joy Crafts Fancy Oval 6002/0258 die set.  

Wednesday, 14 August 2013

Christmas Bauble card tutorial

I have been making a Christmas Bauble card with woven ribbon to make a lattice pattern in a aperture, and thought I would share it with you by doing a tutorial.  I have only done one other tutorial on my blog, so I am new to this, so I hope the instructions make sense.


This is a finished card. But for the tutorial I am doing a green version. 


Some of the materials you will need to make the card are a reel of 3mm ribbon, some card that coordinates or contrasts the ribbon, a holly die, I have used the Marianne creatable holly LR0244, some red gems and a ribbon tied from the ribbon.  

 I have done my version on the Silhouette cameo, but you can achieve the same results if you have a Christmas Bauble die such as the Marianne Creatables, or the Spellbinder Heirloom bauble die.  Bare in mind though, that if your die isn't perfectly symmetrical,  then you will need to flip your top piece over, so that they fit perfectly on top of each other for the finished card.  

One piece of white card is 23cm x 18cm 
 which will be folded in half to make the card. The second piece that is 18cm x 11.5cm.


The bauble is is cut into both pieces.  The larger one is cut so that the bottom point is 2.5cm from the bottom, and 2.5 cm in from the right hand side.  The smaller piece is 1.2cm  from the bottom and 1.2cm from each side.  


The piece that you cut out, use as a template and draw around the outside on a scrap piece of card like the one below, and draw a diagonal grid 1cm between lines.


Next lay the larger piece over your grid, and fasten down with removable tape if you wish.


With a reel of of 3mm ribbon.  Anything will be OK, I used some gold edged ribbon for some of my other examples.  Cut small pieces and stick each one along one side with some acid free sticky tape.  Leave the other end loose at this stage. 


Next you want to weave another strip of ribbon under and over the pieces you have already stuck down, going on the diagonal by lifting every second ribbon and slipping it under, and letting it fall back into place.  Once you have finished, stick it down each end.  


Continue in this way, gradually filling up the aperture.  


You must make sure you don't go beyond the area that is to be covered with the smaller cut out piece (top) as it is to hide all the tape and ends.  

When you have completed this, go around the outside area of the bauble with double sided tape, to look like the one below and set aside for the time being.


 Now we need to get the top (smaller) piece ready.  


With the side that is going to be the front, put a small piece of ribbon folded over the top down to the top of the bauble, and folded through the top of the cut shape. Stick this down at the back with some sticky tape, like below.


With your contrast or coordinating card cut a piece that is 9.5cm x 16cm. 
(Apologies, this piece is actually a forest green, but it didn't photograph very well)
Using your top piece as a template, lay it on the card centering it so that the green forms a border around it, draw around the cut out piece with a pencil.  


Next you want to cut roughly around this shape making it slightly bigger than the pencil outline, and remove the piece.


Now mount the top white part with the ribbon strip onto this piece with double sided tape, so that it makes a small frame around the top part.


Go back to the base part, peel off the top part of the double sided tape that you have put around the woven ribbon, and now mount the top part onto the base, with double sided tape around the perimeter, making sure you match the two apertures perfectly.  Press down where the top meets the woven ribbon to make sure it seals the layers.  


Finally cut out some holly
stick it either side of the ribbon strip that goes to the top, glue the ribbon bow over where they join.  put some red gems as berries on to the holly stalks.  You can put a sentiment onto it if you wish, I chose to leave it simple and clean.  


Below is some other colour variations I have made and some other versions with a slightly different shaped bauble, with some music paper as the top and a poinsettia as well.  


The possibilities and colour combinations are endless.  Do give it a go, and I look forward to seeing some done.  


Wednesday, 7 August 2013

Apricot and white spellbinder sympathy card

Another Sympathy card, this one done with one of my most favourite dies at the moment.  The Spellbinder A@ scalloped Borders One die.  It is so pretty!


I have kept it simple really, I folded a piece of card in half and put a combination of 3 of the borders together along the bottom edge and ran it through the cuttlebug through both thicknesses.  I did the same on another piece of narrower card, and embossed it.  I then scored a line just above the border design, and cut a flap about 1 cm wide from the other side of the score line.  I cut a piece of apricot card with just a narrow border die, just slightly deeper than where the bottom border on the white finishes.  I cut it out so that it fitted inside the flap of the white piece, so that it formed a liner underneath the white piece.  I stuck down the flap that you have created, along the top edge of the folded card on the front.    

Next I embossed another small piece of card with the 'tied together' couture creations embossing folder, and framed it with some apricot card and stuck it on the front of the card, over the flap (so you hide most of the flap) and finally put a bit of double sided tape on the inside of the flap and stick it down over the embossed piece.  

Finally I cut out an computer printed sentiment with the tag from the Spellbinder A2 Filigree Delight die set.  I cut out a piece of Apricot scrap card, slightly bigger than the tag, popped some apricot pearls on it.  finally I tied a ribbon and bow at the top and it is finished.  

Monday, 5 August 2013

Two variations of Sympathy Card

The design team were been asked to do some Sympathy cards for The Fat Cats Card Corner, so I did these ones in two colour variations.  

The first one I did in Black, white and silver.


It is rather hard to see, but the black strip in the middle has been embossed with the Anna Griffin Rosa 5 X 7 embossing folder.  The silver and white flourish designer paper either side of it all framed with black on a white card base.  The centre oval is the Joy Crafts Fancy oval die which I sponged with silver around the centre.  The Sentiment is the Elizabeth Craft Designs die.


Behind the flowers is the Cheery Lynn Fanciful Flourish die, and the little leave are a Marianne Creatables Anja Leaves 1 die LR0226.  The black flowers are made with the Cheery Lynn Build a flower Dies set #3, the silver edged roses are made with a six petaled flower punch.  The little flowers with the black centres are made with two sized small and mini 5 petal flower punch.


The second one is the same embossing folder, a different designer paper, and the same oval die and sentiment.  This one I put the flowers and flourish punch around the top.  The centre mauve and the bottom mauve flowers again were using the Cheery Lynn Build a flower #3, the roses were made the same but this time I didn't put the very centre part in but put some pearl stamens.  Then the small 5 petal paper punch for the white flower with the mauve centre, which I did with some Mauve puff paint.  

Wednesday, 24 July 2013

Sympathy with roses

This is a Sympathy card I have made to keep in my stash.
I have used the Tied Together Couture creations embossing folder for the background and the central panel. I have put a dot of liquid pearls at each junction   The two side panels are done with the Marianne creatables Vintage Decoration die LR0269.  The centre is the Marianne Craftables Square and Stitch die CR1240. The roses I have made and the leaves are the Ash family punch.  
Finally the With Sympathy sentiment is the Elizabeth Craft Designs die which is cut out of silver mirror card, which looks a lot better in real life than shows in the photo.  


Wednesday, 10 July 2013

Christmas Cards already!


I have been making Christmas Cards for Fat Cats Card Corner

The first I used the new Marianne Craftables Square & Flower Stitch die CR1240 which I did in red mirror board and then the flowers and leaf dies as well from the same die set.  The flowers I cut 3 for each flower out of a pearlised light card, shaped the petals slightly and glued them on top of each other, alternating the petals on each layer.  Then put a green gem into the middle of each.

The background is embossed with the Cuttlebug Holly and Berries folder.  The music book is done with some music digital image, reduced and then printed on to a piece of card. It was then cut out with the Marianne Creatables Open book die LR0235.  Which I sponged around the outside with the Antique linen Distress ink and drew some gold gel pen onto the embossed parts of book pages

The sentiment is made with the Marianne Collectables Die and Stamp Banner and Text Christmas Set


The second one is a little bit different, I have tried to make it have a vintage look.

The vintage paper in the background was from Far Far Hill which has some wonderful free downloadable papers and elements.

I have used a vintage Christmas image from which is framed with the Square and Flower Stitch Marianne Craftables Die CR1240 with a paper heart doily behind it.  
The sentiment is done with the Marianne Collectables Banner and Text Christmas Stamp set.  
The poinsettieas are also a Marianne Creatables die LR0122, with the Holly Branches LR0244 behind them, and behind that is some antique cream lace.


The final card I wanted to use something other than a bauble die to make the Christmas bauble.  
So I used the Marianne Craftables Round Passe-partout  die CR1239 to cut out the circle, and then wove some red ribbon that has a gold edging onto another piece of card just bigger than the die cut, and attached it behind the circle.  I raised this piece of card up with sticky foam and mounted it onto some red card and then onto the white card.  I then put the narrow piece of ribbon up to the top for the hanger, and some Marianne Creatables   Holly Branches die LR0244 with some little red gem stickers on them for the berries.  A bow on top of that with the fine ribbon, and the sentiment at the top which is the Marianne Collectables Banner and Text Christmas Stamp set to finish the card


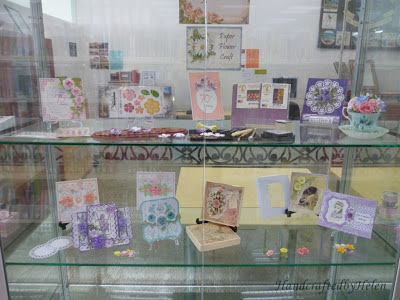
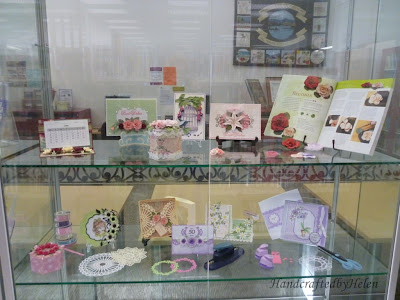
Paper flower display


Our local library has a 'Winter Craft' theme for its displays this month, and I did a display of paper flowers and cards in their display cabinet.  I wanted to just concentrate on cards, boxes and calendars that I had made with 3D flowers. There isn't anyone in my area who does this sort of flower making.  To fill in the gaps between the display peices, I  put some doilies, die cuts, and some of the materials you use in making this sort of card. I also put in a few of my boxes of pre-made flowers that I have in stock.  


I decided when I was getting everything gathered together to take to the library, I felt that there wasn't enough of other things I had made with the flowers, it was mainly cards or boxes, so I decided I would have a go at doing a small posy of the flowers in a teacup.  Teacups seem to be really 'in' at the moment, and I have always had an intention of doing a paper cup and saucer sometime.  Well I didn't have time to do that for this display, so I found a lovely tea cup and saucer set that I had from my Grandmother, so put it in that.


I think it is quite cute! In time I will have a go at making a paper cup and saucer, so that the entire thing is made of paper, but for now I am happy with this.

Tuesday, 28 May 2013

Anja Vintage decoration die cards

I have made two cards for Fat Cats Card Corner with the new Marianne Creatables Anja Vintage decoration die LR0269 .  

The first one I made was this one, with the two die cuts top and bottom that I have backed with Mauve card.  As you can see the front is a normal card and then I have extended the die cut above this on the back part.  


The front I have used one of the older Marianne Designables Swirl Cut and emboss folder,
and then on top of that I have put a flower image which I have edged with the Marianne Creatables Anja Ornaments 2 die on the side.  


The next one is one I have made with the same die, but this time I have backed it with a second die cut which fits onto each other perfectly.  


The middle I have used a pretty rose paper, and then have used the Marianne creatables Doily die Designer doily.  The vintage image of the girl has been framed with the Marianne Creatables Small Oval LR0235


The flowers are done with some bought daisies which I molded slightly and glued two together and then put a pearl in the middle.  


This is the how it looks when the flaps are closed and tied in a bow.
                                                                    

Lady with Yellow

I have done another card in the vintage style using a vintage photo image.  


This one I have used the Marianne Creatables Anja Corner die LR0200 at the top of the background, some ribbon and lace, and then some 7 gypsies design paper behind the vintage image.  


The flowers I have made with the 'My favourite Things' die called Mini Hybrid Heirloom Rose die, but I have only used the smallest of the two outside petals, which I have wet then scrunched up, then allowed them to dry out, before joining them together.  I then layered 3 of them for each flower, and finished them off with some yellow glitter stamens.  

I made a box for this to go into, and decorated the top cut away area with the Marianne Creatables  Anja Vintage Ornaments 2 die LR0270.