Free background from VintageMadeForYou

Wednesday, 19 November 2014

Butterflies everywhere!

I have been making some butterfly cards, as they are so popular and I love them.  Flowers and butterflies are my thing!


The first two are the same design, but different colours and slightly different backgrounds.


This one I have used some flock cream paper (actually wallpaper) for the background, mounted on a white card base, and put some corners using the Nellie Snellen corner dies.  The frame is done with the Spellbinder Gold labels four which I cut two of.  One I cut the inside out of with the standard Labels four die which was mounted with foam tape, on the top of the designer paper which was stuck to the base full second gold label four.  The sentiment is done with the centre die from the Gold labels four set too.  The paper bow is done withe the Sue Wilson filigree bow with a crystal brad in the centre.  Finally the butterflies are the Memory Box Kaleidoscope butterfly.  


This second one, has turned out to be my favourite card at the moment.  You know how sometimes you do a card, and somehow just the colours and patterned paper you combine, somehow makes it special without realising it until you finish it, and then you think wow!  Well this is one I think is very pretty, if I say so myself.  
have used a spotting pink paper for the background, matted on a white card base, and then stuck some bling corners and strips to create a border. I have done the same frame as the one above, but used a pretty rose paper for the inside of it.  The same sentiment and butterflies.  


The next two I did some stenciling for the backgrounds.


This one I have used the Memory box stencil called 'Butterfly Vine' which I brushed with Shabby Shutters Distress Ink on white card, and then mounted it on some mauve mat and then on a white card base.  The flourish is the Cheery Lynn Fanciful flourish.  The butterflies are the same as the two above.  The sentiment is some silver peelcraft stickers on the Memory Box Pastry Label die. 


This one has the 'Modern Blooming Frame' stencil which I did with Spun Sugar Distress Ink, then mounted on mauve mat, and then a white card base.  I kept the rest very simple with the Kaleidoscope butterfly, a bling flourish, a ribbon triple bow with a diamante bow slider/buckle.  I cannot take the credit for this bow, I saw a You tube video by Christina Griffiths doing this loop bow and thought it was great, The link is here.

All of these cards were all relatively quick to make, and are the sort of cards that would be good to have in your stash, without sentiments, that you can then add at a later time, when you have to find a card quickly and can make it any type of card.

Wednesday, 15 October 2014

3 more Christmas cards

Here are three more Christmas card, this time they are pretty much the same just with subtle variations.

The die I have used is the Cottage Cutz Nativity ornament.

The first two are pretty much the same layout, but I have just altered the colour of the nativity ornament and the ribbons and sentiments.


This one I cut the ornament out of black card to look like a silhouette and then backed it with a piece of card I had sponged distress inks on.   I used mustard seed, tumbled glass and salty ocean.  The holly sprigs are the Marianne Creatables Holly die LR0244 and the embossing folder is the Craft Two Christmas ornament. The sentiment is the Cheery Lynn Merry Christmas sentiment but I trimmed off the snowflakes.  


This one is the same configuration, but I have cut the ornament out twice.  One in white and one in black.  I was just going to do it in white only, but I felt it didn't stand out from the background, so I cut the second ornament out in black glued it to the back of the ornament, once I had glued on the background.  It gives it a shadow effect.  I also raised it up with some foam tape.  The background and sentiment are done with distress inks, mustard seed, spiced marmalade and fired brick.  


This last one I left off the holly sprig and bow and kept it much simpler.  I did the ornament differently (was an accident, as I forgot to put the distress background on before gluing on the black ornament to make the shadow) So instead it was glued on behind the white and black ornaments.  I rather like this effect.  This one the background was done with mustard seed, spun sugar and Victorian velvet.  

I think this is a really nice ornament die, the detail is amazing.  I think I might have a go at cutting it out in quite a few colours and then piece the different parts of Mary and Joseph and the manger, star, bow etc.  


Christmas ornament cards

I have been making some Christmas cards with a set of Christmas Ornaments called "3 Lacy ornaments" by the Paper Artist company

Each one I tried to use them in a different way.  
The first is a very simple card.  I made a base card and put a piece of Christmas Holly paper on to the base.  Next I cut a piece of white card narrower than the width of the base card.  Overhanging the edge of this, and towards the bottom I cut out one of the ornaments so that I was left with a aperture, the shape of the ornament.  I then raised this on Foam tape so that it was raised up above the Holly paper.  I also added a thin gold strip down the left hand side just to lift the plainness a little.  I then cut out another ornament with gold mirror board and inset it into the aperture.  Finally some red ribbon and a bow.

The next one I used the two other ornaments in the set, I cut out one of each from a scrap piece of card, and a sprig of holly with the Marianne creatables Holly die LR0244 and lightly sponged the background with Tim Holtz distressed ink "mowed lawn".  

I then cut two of each ornament, one in silver glitter card, and one in red mirror card.  I popped out all the little pieces into a box lid.  I stuck some silver thread to the back of each ornament and then glued the ornament onto the background.  I threaded the silver thread over the top of the background piece of card and stuck that down at the back.  I then went through and glued in all the little pieces from one ornament into the alternative colour, so that they each had a contrast.  This mean that I had two sets of ornaments, so I was able to make two of these cards.  
Finally some silver thread bows at the top and a sentiment which was stamped with versamark ink and then embossed with a red glitter embossing powder, and then cut out with a frame die.  The background was glued onto a matt of red mirror board and then onto a white card base.   


This final one was done with the two larger ornament dies, which I cut out of white card, then inked them with versamark ink and then embossed them with a pearlized cream embossing powder.  I also did the same with the sentiment which is the Cheery Lynn Merry Christmas sentiment, but it came with a snowflake on the M and the C, but I didn't want it, so I trimmed that off.

The green designer paper was stuck on some gold mirror card and then stuck to a white card base. The music is a photocopy of printable that I got from pinterest, which I then tore around the edge and distressed it with some brown ink.  The holly sprig is from the same ornament set and I popped on some glitter balls for the berries.  

All three cards are quite different, but with one set of dies.   

Tuesday, 5 August 2014

I have just discovered Creative expression dies by Sue Wilson and was lucky enough to get one to try.  I got one of the Californian collection called San Francisco, so have done a few cards for Fat Cats Card Corner.


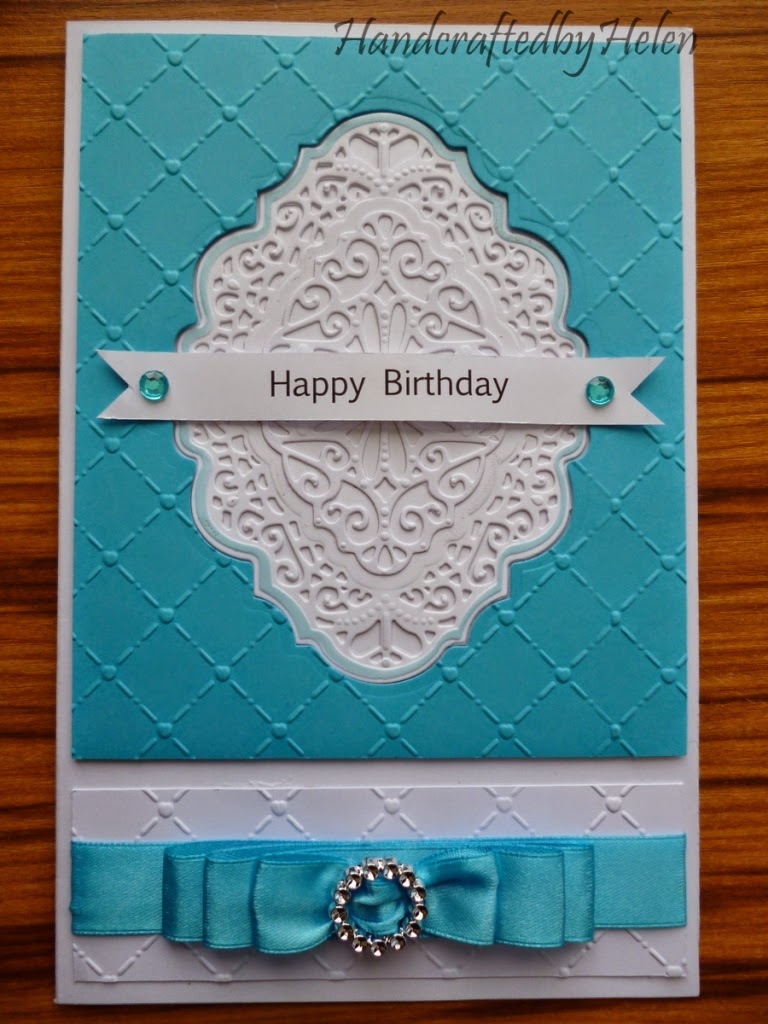
The first one I kept quite simple, using the outside frame to make a aperture embossed it with the Ecstasy craft delicate hearts embossing folder, and raised it out with foam tape, and then set the die into the aperture. I lightly inked the edge of the die cut before taking it out of the die.  


I made a banner with a sentiment that I made on the computer, with a turquoise gem on each end.  I then cut a strip of white card and embossed it with the same folder, put a tiered bow on to it with a diamante centre to finish it off.  I wanted it to be very simple and elegant.  


Another card I did was a very simple but elegant card that I could use for an Engagement, Wedding or Wedding Anniversary, so I kept the insert blank but cut a lovely border down the edge with the Martha Stewart heart border.

For the front I cut out the fancy filigree die from the set, into a piece of white card stock and embossed it, and matted it onto some cream pearlised card and then raised it with some foam tape onto another piece of white card mounted on the cream pearlised card.  I cut the centre part of the die set, and glued this onto some cream pealised card and then cut around the edge and mounted that into the centre of my filigree frame with some foam tape.  
Lastly I dotted some tiny pearls onto both die pieces and tied a double bow with some cream satin edged organza ribbon and a pearl brad in the centre .  I just love this card, and I am sure I will make more of them, with different colour combinations, I think it is such a lovely die.


This next one I embossed a piece of mauve card with the ecstasy delicate hearts embossing folder and cut a slightly curved piece off the bottom.  I put some designer paper behind it and trimmed it to fit onto the card I wanted to use.  I then put tiny pearls into each junction on the embossing folder.  This was then matted onto white card, mauve card and then raised with some foam tape and put onto my card base.  The sentiment is the outside cutting die with the filigree die cut and embossed and then sponge around the outside edge and the inside part where the sentiment is.  The sentiment was done on the computer.


I then made some rose which I cut the petals out with the Spellbinder rose creation dies, using the second to smallest die in the set.  I love love love this die, it makes such lovely roses.  Before I put them together I sponged the outside edges of all the die cuts with the Tim Holtz dusty concord inkpad.  I glued them along the join of the embossed card and the designer paper and put some white leaves which are from the Marianne creatables Anja leaves 1 die.  


The last one I have done, I got the inspiration by one of Sue Wilson's you tube videos where she made a background using the centre die, and had put the crystal snow behind it with double sided adhesive strips which looked really gorgeous.  I decided to have a go at using it as a background but decided to see if I could make it more masculine looking.


So how I made this, was to cut out two strips of card about 5mm wide and stuck the first on the top of a card I had done a sentiment on the computer and printed out.  It is about 7cm down from the top.  I cut out 4 of the centre dies and embossed them.  I glued two of them below the strip, centering them horizontally.  I then cut up the other two up, and glued them around the other two, continuing the pattern and to fill in the gaps.  Finally the second strip was glued under the die cuts.  Three pearls that I coloured with an alcohol pen which matched the burgandy card.  It was so simple, and think very striking.  It would be great in blue or green as well for a man.  

I love this die set, and hope to get more of her dies in the future.  They are really gorgeous and have been really well thought out, so that they are very versatile.  I think we fail to use our dies to their full potential, as they can be used for so much more than just one way.  Think about using them for backgrounds, or in a different way for the focal point!  And that is something Sue Wilson does well on her Creative Expression you tube channel.  She shows other ways of using her border, frames and has some great stamps to use with the dies.  Watch this space, I am sure you will see more ways to use this and any others I might buy in the future.  
  

Thursday, 10 July 2014

Book Easel card


I wanted to show you the cards I finished last night. it was for a lady at work, who has belonged to a book group for about 11 years, and one of their ladies is moving away, so she wanted a 'book type' card to give her with a present. She came up with the words for it,  I modified the idea of the 'bookatrix' type ones, as I don't have one of those, but looked up quite a few shape options on google images, and then drew one freehand, then made it into a easel card. I then used flowers from my stash, which is with all sorts of punches and dies and silhouette cameo cutting files, so I will just tell you about the ones that I remember how I had made and the other components of the card, They are as follows:

The dies that I have used for the sentiments is the MFT(Die-namics) Oval Decorative Duo dies. The silver mirror board to represent the pages of the book, I have scored slightly with my score board for the straight ones down the sides and freehand for the ones at the bottom and top.  You can't quite see it in the photograph.


The little blue roses in the top right corner and the top of the bottom left hand grouping of this photo are made with the spellbinder rose creation dies (the smallest and second to smallest size)

The leaves are punched with a punch I have had for years and years called the 'Ash family leaves' it has 3 different sizes in one big punch. 
The butterfly was cut out on the silhouette cameo.


The big daisy on the bottom spray (and also on the bottom of the photo above, was made with the silhouette cameo, cutting out quite a few layers of a simple daisy cutting file, and then curling each petal slightly and gluing them on top of each other, I think there was about six or seven on each daisy. The centre is a big roll of quilled yellow paper, it is a long strip that has been cut all the way along it, very finely, and then rolled up and then fluffed out.


There are some pink roses and rose buds, done with a six petal flower punch, and the two white flowers with the yellow centres, were done with the retro flower punch and a sun punch for the centre.  The four white bell flowers (two at each end, and the blue ones tucked in by the centre daisy were made with a a lilium punch.


Underneath the flowers on the bottom part is one of the Spellbinder tag 2 dies that was cut in half and the put at each end of the centre die from the spellbinder radiant rectangles die which looks like this. 

Two more tiny butterflies from the Cameo and then finally the back panel I put in, so the ladies could put their names on it, was just punched with one of the fiskars border punches that embosses and cuts, not sure what it is called.


The box I made by hand by measuring the length and width of the card, and then adding 2.5cm (1 inch) to each side and then made the lid 2mm wider at the base.  I cut the window into the lid with the outside die of the spellbinder radiant rectangles die.  
It has taken me most of the week and a bit of last weekend to make it, but she loved it, so that's what counts.  

21st Birthday Card

I have just made a card for my Daughter for her 21st.


I made the card with some flourish designer paper, and then used the Anja's border Marianne Creatables Die LR0300 which is the white part top and bottom, with a strip of card between. On top of that is a white oval with the sentiment and matted with a purple oval.  The 21st is a cake decorating plastic numbers I had lying around. The wee doily at the bottom with her name on it is the centre of the round passe-partout Marianne Craftables die.

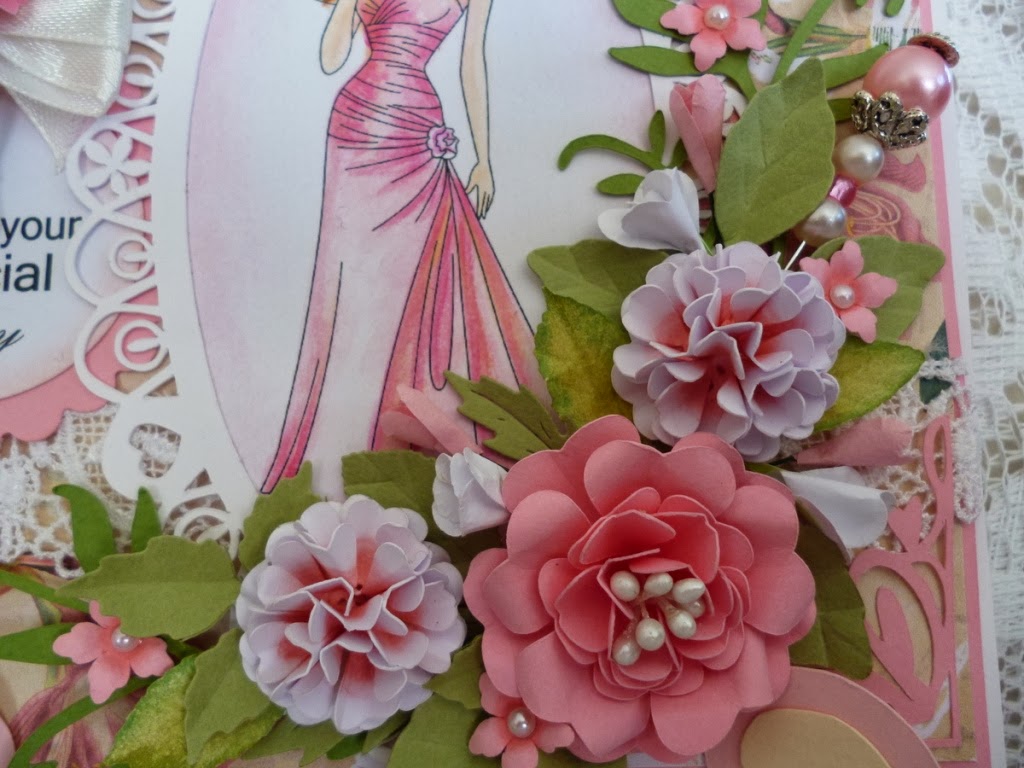
The largest flower is a spellbinder rose creation rose. All the rest of the flowers are roses all made with a six petal marianne creatables die, but you can get punches and dies of various different brands just like it too.  You can also make this rose with a 5 petal punch or die, and they turn out well as well.  They look like either of these;


All the roses are just made a slightly different way or different sizes.  The mauve and white ones next to the Spellbinder rose is made like you see various different you tube videos, just do a search for paper roses with a punch.  There is a lady called Sandy Risi that does a great tutorial and another lady called Patty Gorka who also does one which shows you how to cut the petals for each layer, mold them and glue them together.  The little pink ones I have not molded at all, and the white ones with the purple stamens were done molding the petals then then turned them upside down, and left the middle out and put stamens in instead.  The buds are just one petal, but I have snipped the parts between each petal into the centre a little, and then folded 3 of the petals into the centre and glued them, and then the last two petals around the centre ones.  Then added a calyx punch and threaded them onto florist wire.  

Finally some flat pearls, and a diamante key embellishment that I had bought years ago to finish it off.  I made a box for it, like some of the other boxes I have made, but I made this quite plain, as I didn't want her to see the card until she had opened it.  She loved it!

Thursday, 22 May 2014

Two Tattered Lace Fairy Cards

I have made a couple of cards using the Tattered Lace die 'Fairy Tinks' for the Fat Cats Card Corner.  It is a very cute die, and I think it lends itself very well to girls cards.


This one I cut it out from some pale blue card and then embossed it with versamark ink and some crystal sparkle embossing powder.  I also did the same with the two matting pieces behind the designer paper and the embossed white piece that the fairy is on.  The Embossing folder is the Kingston 'leaves and butterflies'.  The designer paper in the panel behind the flourish is a very pale blue with some glitzy leaves and flourishes on it, sorry you can't see it very well in the photograph.  The flourish is the Fanciful Flourish by Cheery Lynn and the sentiment is done with the centre doily from the Marianne dies Passe part-out round die set.  The flowers are a selection of bought flowers from my stash.


This second card I cut out the fairy die in three different colours, an pale apricot for the skin. Mauve for the dress, and a gold hologram card for the wings.


The papers are downloaded papers that I have printed out, the doily is the Marianne Creatables Doily frame LR0130.  The flowers are the Cheery Lynn Sweet Christine strip die and leaves are the Ash family Punch I have had for years.  The Sentiment is a Memory box pastry label set.  I have just drawn on the word 'Wish' freehand with a fine black pen.  

The Tattered Lace dies are such intricate and pretty dies, I love them, and hope to own more of them! 

Tuesday, 13 May 2014

Zinnia Garden

Another card done for Fat Cats Card corner, but this one I decided to something a little different for me, and decided to when I had made the flowers, and put the buttons in the centre, they looked a little like faces!  So I decided to make a fun wee garden setting with a gate and a fence, (not that you can see it very well).  


The flowers are made with the Cheery Lynn Sweet Christine Die strip, the grass was cut out on the Silhouette Cameo.  The gate is a Poppy Stamp die called Garden Trellis.  The cloud, leaves and stalks I just cut out feehand.  The butterflies were some I had cut out also on the Cameo ages ago, and cut out more than I needed to use again in other projects.  I think they really do look like little faces 

Mothers Day Card in Pink

Another card I have done in a Mother's day theme, this one using a background paper that had roses and music, so I cut out the centre with the Passe-partout die from Marianne Craftables.
This one was done for Fat Cats Card Corner 


Then the flowers including the buds were done with the Cheery Lynn Small Gardenia strip die set.  It makes such a pretty flower.  I used only the first few parts to make the buds.   The leaves were cut out with the Ash punch set I have had for years.  

Wednesday, 7 May 2014

Red & White Mother's Day Card


This weekend it is Mother's Day, so I thought I had better make a card for my Mum.  I didn't think I was going to get it finished, and was running out of time, but I got it made, and thought I would share it with you.


I have used two of the Vintage Decoration Marianne Creatables die for the LR0269 leaving a gap in the middle, and then making a liner in red by freehand cutting it. The Embossing folder is the K.Kingston 'Leaves and Butterflies' which I have had for ages, and love.  It is a great one for doing multiple times on a piece of card, and being able to do it from different sides without looking upside down.  The flowers are done with the new Cheery Lynn strip dies, the shaded flowers in the middle are the small Gardenia strip and the red ones are the Small sweet Christine strip with a brad in the middle.  Hopefully she will like it!

Saturday, 1 March 2014

80 Birthday Card

I have made a card for Fat Cats Card Corner this one using the Marianne Creatables Anja Border LR0300, which I think is really beautiful!


I cut out two of the main border, and stuck them together as mirror images of each other.  Mounted them on to a pale pink paper.  The centre is the tag from the Spellbinders radiant rectangles set.  The roses are made with a 5 petal die by Marianne Creatables called 'flower set die' from some time ago.  The white ones, I left out the centres and put in pink stamens.  The buds are made with just one of the petals that I have slit nearer to the centre, the cupped, glued onto some florist wire, and then glued a calyx to the bottom of the bud.  The tiny flowers are spiral roses using the Impression Obsession spiral flower die set.  The leaves are done with either the spellbinder rose leaf from their leaves set, and the Marianne Creatables  leafy swirl die. Finished off with a few pearls, and the 80 cut out with glitter card.


I finished it off by making a box on my  Silhouette Cameo with a window with acetate, so you can see the card inside.  
 

Pom Pom flower tutorial

I have been asked how I made a pom pom flower some time ago, and thought I would make a tutorial to show how it was made.  I do have to apologise about the quality of the photos, as I did it in a hurry, and for some reason, my embossing mat, has started disintegrating, and after I had taken the photos and made the flower, I see some of the photos show little dirty black specks that must be bits of the mat.  They look horrid, so I apologise for those.  I also used a light card to make them, it was about 160gsm, but I think it is probably a little thick, would probably be better with a paper.

I have used a cutting file on my silhouette cameo that I made myself from a picture of a punch I think, but it was quite a long time ago, so I cannot remember what punch it was from. You could use other punches or dies, and several that would be ok to use would be the stampin up Flower shop bundle punch, the Cheery Lynn Sweet William die, the Carl Sakura punch, the punch bunch blossom punch etc. The only thing to realise is that if you are using something like the blossom punch, if the petals don't go very far in to the centre, you may need to cut them into the centre a little, as later when you have to fold it up, you won't be able to.  

So here is the shape I used.  I cut a bunch of them out on the silhouette cameo, but you need 10 of them for each flower.  


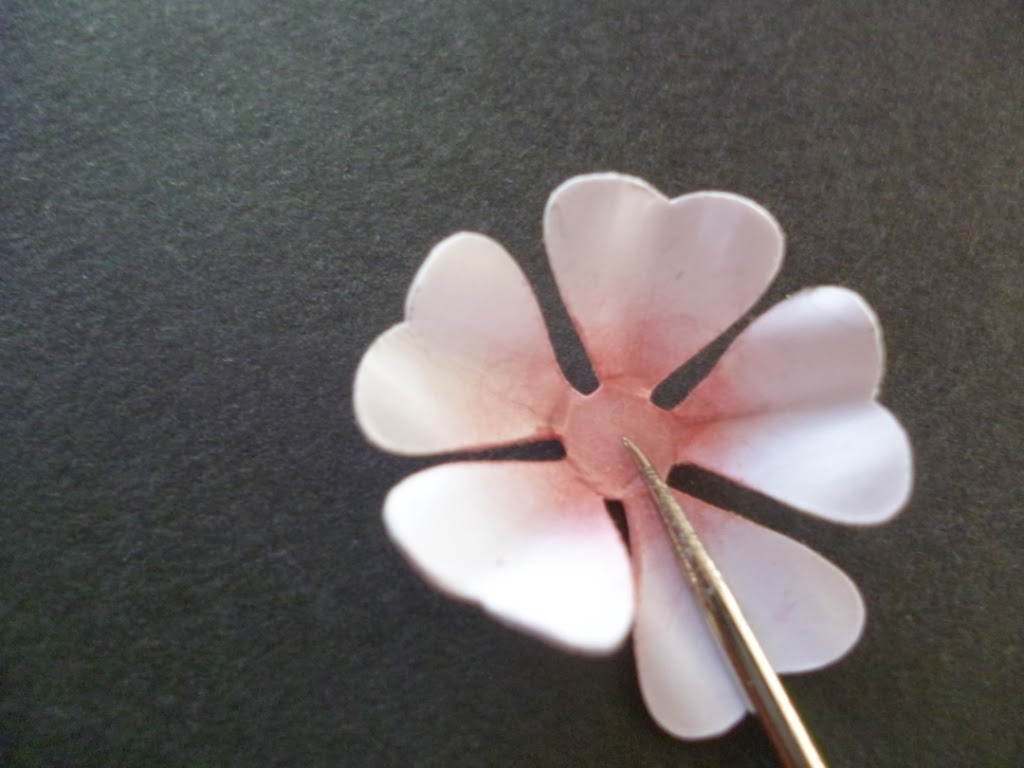
The first thing you need to do is colour the centres of each flower, on both sides, this doesn't need to be terribly neat, as you just see a hint of colour on the inside of each of the petals when the flower is finished.  I used a colour called old rose, a versacolor ink.  


The next thing you need to do is shape and mold each of the petals on 9 of the flowers (you leave one that is not shaped), This give dimension and helps be able to fold the petals up.  So I go around each flower and mold the two edges of each petal all around the flower on one side.


The next thing to do is flip the flower over, and mold the centre part of each petal all the way around the flower, you will see the petals begin to fold up as you go around. 


Once you have finished all 9 flowers, you need to cup each of the flowers and lightly squeeze the ends.


You are now ready to put the flower together, So take the one flower that you haven't shaped, this will be a base for the flower.  Put a dab of glue onto one side of a folded flower and glue it onto the base, positioning it to the edge of the outside of the base petals and staggered between two of the base petals,  like the photo below.


You now work around the rest of the base, doing this with 4 more of the petals. this forms a rosette of petals but leaves a whole in the centre, like below.


Now with the final three petals, you are going to stick them onto the top of the base layer, sometimes you need to push them down into the gap in the middle, as they tend to want to sit up a bit higher.  Just push them a little into the gap and they should look like the one below


This is completed, so just let it dry and it is ready to use on a card or a similar project.

Here is an arrangement I used them on.  


I hope you like them.  I think depending on what die or punch you use, you can end up with a more frilly look like a carnation, especially if it has quite uneven or jagged edge to it.