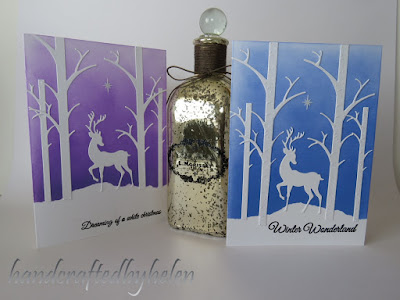
This card I have kept quite simple with the ink blending using one colour only, but you could do a blended background with multiple colours and it would look great, I just chose to have a more simple and clean look to the card.
I started off by stamping a sentiment on the bottom of the card, then used some masking paper to make a snowy bank mask to put along the bottom of the card. I wanted to try the Tim Holtz Distress Oxides, which I have resisted buying up to now. I had seen reviews that they blended very well and went on very 'creamy', so wanted to try and see if they were that different from the normal distress inks. So for this card I used the blueprint sketch colour and blended onto Tim Holtz watercolour paper from dark to light from the masked area up. I kept going over and over it, until I was happy with the 'strength' of colour, because I was using just one colour, I wanted it to me quite a contrast to the white on the rest of the card.
So once I was happy with the ink blending (I did find the oxides to be lovely to blend, but took some more time to build up the colour, as they seemed to be more pastel in colour), I cut out two of the larger trees and two of the smaller trees and one of the standing deer from the set I had purchased from aliexpress.
Then it was a matter of sticking the trees onto the card and the deer between them. Final touch was a star shaped sequin I had in my stash for years, I thought that would make the scene a little more 'Christmasy'.
I also did another colour variation to see how that ink went as well. Not exactly traditional colours for a christmas card, but I like to push the conservative card makers out there!
Here is a video on making the blue card. If you would prefer to see the video in full HD then go to my YouTube channel here.
The materials I have used to make the card are:
Card base 5" x 7" from Tim Holtz water colour paper
Distress oxides Blueprint sketch & Wilted violet
Mini distress tool and foam
Inkadinkadoo masking paper
Joy Crafts sentiment set
Painters tape
Misti
Versafine onyx black ink
Ranger clear embossing powder
Embossing buddy
Heat tool
Tim Holtz craft mat
Deer and trees scene die set
star sequin
Nuvo glue
Bigshot die cutting machine
Well that is the end of my Christmas card series for 2018. It has been an epic year with my blog and YouTube channel. I made a decision to do less videos this year, so that I could concentrate on coming up with a range of styles and mediums for my cards, but still trying to keep to the philosophy that the cards I make can be done with what you might already have so that you don't have to keep going out and buying more and more supplies, like some video makers seem to expect! It takes a lot of time to come up with ideas at times, as you don't always feel inspired, but when I do, I usually come up with a few at a time, thank goodness! I also passed a milestone on my YouTube channel of 10,000 subscribers, which blows me away, I never thought I would get anywhere close to that when I started my channel, I just wanted to try and inspire and encourage other card makers to try different things.
I hope everyone has a lovey and safe Christmas and New Year this year, and I will see you in 2019 with some more inspiration (well hopefully)!


