Wednesday, 12 December 2018

Snowy deer scene card

This card I have kept quite simple with the ink blending using one colour only, but you could do a blended background with multiple colours and it would look great, I just chose to have a more simple and clean look to the card.


I started off by stamping a sentiment on the bottom of the card, then used some masking paper to make a snowy bank mask to put along the bottom of the card.  I wanted to try the Tim Holtz Distress Oxides, which I have resisted buying up to now.  I had seen reviews that they blended very well and went on very 'creamy', so wanted to try and see if they were that different from the normal distress inks.  So for this card I used the blueprint sketch colour and blended onto Tim Holtz watercolour paper from dark to light from the masked area up.  I kept going over and over it, until I was happy with the 'strength' of colour, because I was using just one colour, I wanted it to me quite a contrast to the white on the rest of the card.

So once I was happy with the ink blending (I did find the oxides to be lovely to blend, but took some more time to build up the colour, as they seemed to be more pastel in colour), I cut out two of the larger trees and two of the smaller trees and one of the standing deer from the set I had purchased from aliexpress.  


Then it was a matter of sticking the trees onto the card and the deer between them. Final touch was a star shaped sequin I had in my stash for years, I thought that would make the scene a little more 'Christmasy'.  


I also did another colour variation to see how that ink went as well.  Not exactly traditional colours for a christmas card, but I like to push the conservative card makers out there!

Here is a video on making the blue card. If you would prefer to see the video in full HD then go to my YouTube channel here.


The materials I have used to make the card are:
Card base 5" x 7" from Tim Holtz water colour paper
Distress oxides Blueprint sketch & Wilted violet
Mini distress tool and foam
Inkadinkadoo masking paper
Joy Crafts sentiment set
Painters tape
Misti
Versafine onyx black ink
Ranger clear embossing powder
Embossing buddy
Heat tool
Tim Holtz craft mat
Deer and trees scene die set
star sequin
Nuvo glue
Bigshot die cutting machine

Well that is the end of my Christmas card series for 2018. It has been an epic year with my blog and YouTube channel.  I made a decision to do less videos this year, so that I could concentrate on coming up with a range of styles and mediums for my cards, but still trying to keep to the philosophy that the cards I make can be done with what you might already have so that you don't have to keep going out and buying more and more supplies, like some video makers seem to expect!  It takes a lot of time to come up with ideas at times, as you don't always feel inspired, but when I do, I usually come up with a few at a time, thank goodness! I also passed a milestone on my YouTube channel of 10,000 subscribers, which blows me away, I never thought I would get anywhere close to that when I started my channel, I just wanted to try and inspire and encourage other card makers to try different things.  
I hope everyone has a lovey and safe Christmas and New Year this year, and I will see you in 2019 with some more inspiration (well hopefully)!


Tuesday, 4 December 2018

Christmas Stockings Card

This card I am using a set of dies that I got from Ali express.  It is for a series of Christmas stockings and accessories to decorate them with.  I am just using one ouline die, the top cuff and the toe and heel pieces in some contrasting Christmas papers.  I wanted them to be a bit sturdier than paper, so I have used some double-side sticker paper and stuck the patterned paper onto some scrap card, then cut out the different pieces to make up 3 ‘stockings’


I have cut out two panels to go on one of my standard card bases of 5” x 7”, one in green and the front panel in the same white as the card base.


I then stamped the sentiment onto the bottom middle of the white card panel.  I used a piece of hemp string and tied that onto the top of the front panel loosely to look like the stockings have been hung.  I also tied 3 bows with a gold bell on them which will be put onto the stockings once they have been stuck to the top of the card along the string line. 


And that is the card finished.  Here is a video on how I made the card. If you prefer to see it in full HD, then you can pop over to my YouTube channel here.


The materials I have used to make the card are:
Card base 5” x 7“ or 12.7cm x 17.5cm
Green glitter panel made with American Crafts Christmas Glitter pad, 4 ¾” x 6 5/8” or 12cm x 17cm
White card panel 4 ½” x 6 3/8” or 11.3cm x 16.3cm
Christmas stocking die from Ali express
Kaisercraft Yuletide stamp for sentiment
Scraps of green, red, white glitter and blue paper
Double sided sticky paper (Jac paper)
Scrap of white card
3 gold bells
Hemp string
scissors
Double sided tape
Ranger clear embossing powder
Versafine Onyx black ink
Embossing buddy
Misti
Nuvo glue
Heat tool


Tuesday, 27 November 2018

Embedded snowflake Card

This card is a variation of a card I did in 2016, and I still get comments about it.  This is one that has a clean look and quite elegant.


I started by making a standard card base and then cut a front panel a little smaller.  I then used a large snowflake die and cut that out on the bottom right hand side of the card panel, and a small one at the top left hand corner, making sure I kept all the little bits when I took the diecut out of the die and saving the white diecut snowflakes for another card.  I used some wax paper in between the card and the die, to make this a little easier, as I had real problems getting it out of the die the last card. 

I then cut a second version of the two snowflakes, this time out of mirror gold card. I also went ahead and stamped my sentiment onto the front panel in between the two snowflakes but towards the top.


I then put some ‘stick-it’ paper onto the back of the card panel behind the cut out snowflakes.  Then from the front, it was just a matter of putting the gold snowflakes into the cut out part of the same snowflake on the panel, and then putting the tiny bits from in between of the white back into place, so that it ends up all one layer. This isn’t too fidldely, if you want to make sure it is all nice and flat you can use a bone folder to rub over it to make sure it is all sticking to the sticky paper backing. 


Lastly some craft foam on the back of the front panel and that stuck down onto the card base to make the card up.  I finished it off with some flat back white pearls in 3 different sizes dotted across the blank areas and that is the card finished. 


Here is the video on me making the card.  If you prefer to watch it on my YouTube channel on full HD, then go here.


The materials I have used to make the card are:
White card base 5” x 7” or 12.7cm x 17.5cm
White Card panel
Snow flake dies
Kaisercraft stamp set (sentiment)
Gold mirror card
Versafine onyx black ink
Ranger clear embossing powder
Embossing buddy
Misti
Double sided tape
Stick-it paper
Jewel picker
Craft foam
Nuvo glue pen
Bone folder
Flat back white pearls in different sizes


Tuesday, 20 November 2018

Christmas Wreath Card


This card is a more traditional Christmas card with a Christmas wreath. I have seen lots of different wreath cards online, but this one is pretty much using the Impression obsession Christmas Wreath die very normally. 


I have made a card base the size of an A4 card folded in half and then trimmed the other way to make a square card.  I then cut out a gold paper stitched square and a white stitched square to be layered on top of the card base. 

I cut out two of the main wreath die in brown card, which I will layer on top of each other to give a more full look to the wreath, and that is when I decided if I got a circle die slightly bigger than the wreath opening, and cut that in the top white layer, then I could recess the sentiment slightly, to make a bit of a feature of the sentiment.  So that is what I did.  I could then stamp the sentiment on to a scrap piece of card and trim it down to fit behind the circle aperture I have cut out.  Then I could stick the gold layer down onto the card base, then the sentiment where it needed to go to see it through the aperture, then the white layer was stuck onto some craft foam, then stuck down onto the gold layer.  That was the card base done, and now I could get onto the wreath part.


I stuck down the two brown wreaths, cut out a bunch of the two different leaves, one holly and one a pine sprig, in two different greens.  I then started gluing them onto the brown wreath alternating the two types on the bottom half of the wreath, Making sure I overlapped them to give a more full look.


Finally I topped it with a red satin and organza bow, slightly off centre, and then decorated the holly leaves with a few red berries made with some liquid pearls.


Here is the video of me making the card. If you prefer to watch it on full HD, then pop over to my You tube channel here

The materials I have used to make the card are:
Card base 5 3/4 “ square, or 14.5cm
Stitched square dies in 5 9/16” or 14cm & 5 1/8” or 13cm
Circle die
Gold paper
Impression Obsession Wreath die
Vintage Christmas stamp set for sentiment
Brown card, two tones of green card
Craft foam
Double sided tape
Ranger Gold embossing powder
Versamark ink
Red ribbon bow
Glue dot
Liquid pearls – Rouge
Scrap of sticker paper backing
Nuvo glue
Jewel picker
Heat tool
Acrylic block


Tuesday, 13 November 2018

Poinsettia Corner die Card - 2 cards

This time I am making two cards with 2 die cuts but mixing up the positive and negative parts to make them look different.


I start by getting two card bases and cutting out 2 card panels with a stitched square die, one white and one black.

I then cut out two of the die cuts, one in gold foil card and one in silver foil card. Saving all the poinsettia petals as well.

Next I stamp a sentiment on each card panel towards the top right hand corner, using silver embossing powder for the black one and gold embossing powder for the white one.  

I then glue the die cut outlines down onto the card panels, the silver one on the black panel and the gold onto the white panel.   


I now can start to glue all the poinsettia petals into the negative spaces on each panel, but putting the gold into the silver outline and the silver into the gold outline.  


Once this is done, all I need to do is mount some craft foam onto the back of each of the panels and then they can be stuck down onto the card bases.  

And that's the card finished.

Here is the video on making the card, if you would prefer to watch it in full HD then hop over to my You Tube channel here


The materials I used to make this card are:
White card base 5 11/16" by 5 11/16" or 14.7 cm x 14.7cm
A white panel 5 1/4" x 5 1/4" or 13.2 cm x 13.2 cm
Memory Box Plush Poinsettia corner
Kaisercraft Yuletide stzmp
Stitched square die (any brand) 
Silver and Gold mirror card
Versamark ink
Ranger gold and silver embossing powder
Heat gun
Embossing buddy
Craft foam
double-sided tape
Cosmic shimmer glue
applicator bottle
Sizzix Big Shot

I hope you are enjoying making your Christmas cards, and this might have inspired you to do something like this.


Wednesday, 7 November 2018

Christmas series 2018 Christmas Shaker Card

The first card for my Christmas Card series for 2018 has a clean and simple look.


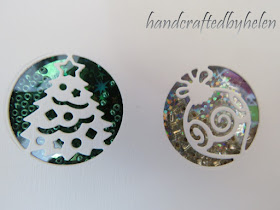
I have used an Impression obsession christmas die called Christmas Circle Cutouts die, it comes with 6 different cutouts which I thought would be great for making christmas tags, but for this card I will use just 3

I have a white card base and a red and white card panel.  I will do the die cutting on the white panel, so towards the lower half of the card, evenly spaced, I cut out the 3 circle dies.  

Before I put some acetate on the back of this panel, I will cut our the craft foam that will be sandwiched between the red and white panels, and will make the room for my shaker beads.  I drew around the circle cutouts onto the craft foam so that I can see where they will be, so that I can then cut out some circles slightly bigger than the cutouts. I will put a square of holographic foil paper behind each of the circles in the foam tape and then that can get mounted on the red panel, which I have mounted onto my card base.  


Lastly I can fill each of the circles in the craft foam with the same coloured seed beads that the foil is, and then the front panel can be stuck down.  


For the sentiment I have cut out 2 die cuts out of red card and one cut out of red foil card of a Merry Christmas die, glue them together on top of each other with the foil ones at the top and that will be glued onto the card panel above the shaker portion.  

That is the card finished, quite a quick one to do and nice and clean looking. 

Here is the video of making the card, If you would prefer to see it in full HD, then pop over to my You Tube channel here.


The materials I used to make this card are:
White card base 5" x 7" or 12.6 cm x 17.6 cm
A red card panel  4 3/4" x 6 5/8" or 12 cm x 16.7 cm
A white panel 4 5/8" x 6 3/8" or 11.6 cm x 16.3 cm
Impression obsession Christmas Cutout die 
Poppystamps Folk Merry Christmas Die
Cottage Cutz stitched circle dies (any circle die will do)
Craft foam
double-sided tape
red, green and silver holographic foil
red, green and silver seed beeds
Cosmic shimmer glue
applicator bottle
Acetate strip
Sizzix Big Shot


Tuesday, 30 October 2018

Watercolour flower card


Todays card is using an outline flower stamp and water colouring it with ink from an ink pad, cutting the flowers and leaves out, and then mounting them on a card inside a frame


I used the Altenew Garden treasures stamp set, but you could use any flower stamps that you have, as long as they are outline stamps you are fine.

I stamped them in clear ink and used gold embossing powder to heat emboss them, and then water coloured them with two tones of pink for the flowers and 2 greys for the leaves.  


Very loose water colouring using lots of water and let the water do the work of moving the ink, and you get beautiful results.  


I cut them out with the co-ordinating dies. I also cut out a frame using the largest size of the simon says stamp stitched rectangles for the inner die cut, then trimmed the card to the width of frame I wanted.  I mounted this onto the card base, then glued the leaves and the bottom flower to the card with glue, the other two flowers I used scotch tape to raise them slightly.  

Finally the sentiment on a scrap of pink card and cut that out to make a banner and mounted that on scotch tape too. and the card is finished.  


Here is the video on how I made the card.


If you prefer to see the video in full HD, then hop over to my YouTube channel here.

The materials I used to make the card are:
Card base i5" x 7 "
Piece of white glitter card & a scrap of pink card
Altenew Garden Treasures stamp
Altenew Birhday greetings stamp (sentiment)
Versafine onyx black ink
Versamark ink
Ranger gold embossing powder
Ranger clear embossing powder
Heat tool
Embossing buddy
Altenew crisp ink cubes in Cotton Candy, Grapevine, Silver stone & industrial Diamond
No 2 paint brush
double sided tape
craft foam
Scotch tape
Cosmic shimmer glue
Applicator bottle 
Scissors
Sizzix Big shot

I hope this has inspired you to have a go at this card.
Next week I will start my Christmas card series for this year, so look out for that.


Tuesday, 9 October 2018

Masked Panel Card

This weeks card is a simpler one, it has a 'sketchy' look and can be done with any flower stamps. I am using the Altenew Garden Treasure stamps set, and just using the 3 outline daisy stamps in the set.


I started my masking off a panel towards the bottom of my landscape 5" x 7" which was left flat and unfolded, with painters tape,  I just eyeballed the panel.  

I then stamped the daisy stamps across the whole panel, overlapping some onto the painters tape, stamping in sets of 2 or 3 at a time and then putting embossing powder onto them, before stamping the next ones, until the panel was all stamped and had embossing powder on it. Finally heat embossing them all at the same time. 


I then coloured them in using the zig clean colour real brush markers.  I did a interrupted pen line around the panel, and a second one just slightly out from the first one.  


The sentiment I used because it had a 'sketchy' font which I felt suited the style of card.

Folding the card in half finished it, such an easy card to do, and you get a different look using different flower stamps and colouring them differently.  I also did a blue variation which I used the other layered stamps in the stamp set, and then did some pen drawing on the top to make the centres 'pop' a little more.   


Here is a video of me making the card. If you would prefer to see it in HD, then you can watch it on my Youtube channel here.


The materials I used to make the card are:
Card base in Strathmore Bristol smooth water colour card 5" x 7 "
Painters tape
Altenew Garden Treasures stamp
Wplus 9 Modern peonies stamp (sentiment)
Versafine onyx black ink
Ranger clear embossing powder
Heat tool
Zig Clean colour real brush markers
050 yellow
052 bright yellow
023 Scarlet red
060 Brown
Artline 200 0.4 fine black pen
Uniball Signo gold pen

I hope this has inspired you to have a go at a panel card, to look at what outline stamps you might have and try those.  


Wednesday, 19 September 2018

Modern Peonies recessed sentiment card


I started off by making a card panel with the water colour card using a larger stitched rectangle die by partially cutting it, made it fit my standard card base
I then stamped the sentiment using the sentiment stamps from the peony set.


I then went around the perimeter of the card using the peony stamps and some of the leaf stamps. Masking some of the flowers when I stamped the leaves, so they would appear behind the flowers slightly. 


I then did some basic water colouring with the zig markers  to make some yellow and blue peonies (yes I know peonies don’t come in blue, but they do Yellow…artistic licence)
Once I was finished the colouring, and it was dry, I cut out an oval around the sentiment …. Aaaaarghhh…this feels so wrong after doing all that colouring... through some of the flowers as well!


I then put some craft foam on the back of the outside part of the card, and stuck that to my card base with double sided tape, just to give the card a bit of dimension and interest.Then stuck the oval down inside that, matching up the flowers all the way around, this was to the card base without any foam tape, so it is lower that the outside.  Things like this take a fairly ordinary card to another level I think. 
That’s the card finished.  Fairly simple and because the stamps have such small petals, it really was pretty basic colouring.


Here is a video of making the card. If you would prefer to see it in Full HD then go over to my You tube channel here.


Supplies I have used in this card are:

Wplus 9 modern peonies stamp set
Sue Wilson stitched lattice frames die
5” x 7” card base
Extra piece of Tim Holtz water colour card for front panel
Versamark ink
Versafine onyx black ink
Ranger clear & white embossing powders
EK success powder tool
Misti
My sweet petunia acetate grid sheet
Zig real brush clean clear markers
Greens 045 pale green & 046 mid green
Yellows 050 yellow, 051 Lemon yellow and 061 light brown 
Blues 036 light blue and 037 cornflower blue
Water brush
Inside outside oval die (not branded)
Craft foam
Double sided tape
Pretty pink posh Sparkling clear sequins in 4mm & 6mm
Jewel picker