Tuesday, 12 December 2017

Winter Scene with Sleigh Card

This card turned out to be a little more complicated than I had first thought, as my cards often do,  when I dreamed it up in my head! I knew how I wanted the end result to look like, but the reality is often more than I think it is going to be.  

Anyway, I won't bore you with the details, If you want to see the circus that unfolded, then watch the video attached, I will give you the details of how to go about making this card here. 


I started off by cutting out a card base with a large stitched square die, and then cut two frames out using 2 stitched dies and one inside and outside stitched die, Making one a bit fatter than the first one.  

Next I cut a variety of trees with dies, it doesn't matter what kind you have, any of the tree dies that you might have will work.  Also I cut a couple of snow slopes out of white glitter paper, with two slope border dies, but again if you didn't have these dies then you could just freehand cut them with scissors.  
Next I put some liquid glue around the edges of the tree, and sprinkled some chunky glitter onto that and put them aside to dry.  

Once they were dry, I was able to take each frame, half the trees and a snow slope, and glue them together to make a scene when I put the two frames together later.  I just needed them made, so that I could decide where I wanted my moon and sleigh for the background.  


The background I made a mask with a circle die and some masking paper, and decided by putting the frames together, where I wanted the moon to be, stuck that down on my background card, and then did some distress inking to make a blended background.  I made sure I didn't go too dark, as I wanted the sleigh to still be seen.  

Once that was done, peeled the masking off and left it to dry, but you could hurry that up by drying the ink with your heat tool.  It needs to be totally dry before doing the stamping and embossing.  

I stamped the sleigh with black ink using the misti, as I wanted a really dark image, so stamped it 2 or 3 times.  Then embossed it with clear embossing powder.  While the misti was out, I stamped the sentiment on a scrap piece of card and cut it out to make a banner.  I cut out the background with the same outside sized square die the same as the frames. 


This is where it went a bit pear shaped, as the thin foam tape I used for dimension between the frames was super sticky and I got in a bit of a mess!

Anyway with foam tape between the first and second frames, and between the second frame and the background gave a little bit of dimension. Once they were done, I could stick the scene onto the card base, and the sentiment on with some foam tape as well and that is the card finished.  

I see I still have the pencil line for where I wanted to put my mask on this last photo.  I did go back and rub that out LOL.

If you would like to see this video in full HD then click here to go to my You tube channel.


The supplies I used to make this card are:

A set of stitched square dies
A set of inside outside stitched squares
A variety of tree dies.
White card base and 2 more sheets of card
White glitter card
Cosmic Shimmer dries clear glue
Quilled precision tip applicator bottle
Strathmore Bristol smooth water colour paper 
Distress inks, chipped sapphire, dusty concord & blueprint sketch
Ranger mini blending tools and sponges
Santa sleigh stamp
Versafine onyx black ink
Ranger clear embossing powder
Misti
Scotch foam tape
2mm foam tape
Snowflake stamp for sentiment
inkadinkadoo masking paper
Circle die
EK success tweezers
Creative expressions iced snow glitter
double sided tape

This card shows the versatility of having some basic dies such as square nesting dies, slope dies and trees to make a scene, this could equally be a general card not necessarily a Christmas card. I like to put my money into dies that I can used for a variety of purposes.

Thank you  

Tuesday, 5 December 2017

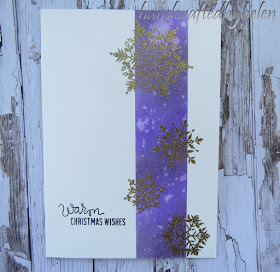
Blended ink panel Snowflake cards

This card is another fairly easy one, and if you like doing colour blending like I do, it is a quick and enjoyable to do.


Both cards are done with the same technique, just the blue one I have done a rectangular panel and the purple one I have done a strip panel.

I masked off the area I wanted to do the ink blending, with either post-it notes or masking paper, to give a nice crisp edge to the blending and to protect the white spaces of the card.

I have blended the colours with distress inks and a mini blending tool, and have used Strathmore bristol smooth water colour paper to do the fronts so that it would blend nicely.  

Once I had done the ink blending, I did the sentiments with black ink and clear embossing powder.  Finally I stamped the snowflake stamps onto and overhanging the inked panels with clear versamark ink and gold glitter embossing powder, using the misti, so that I could stamp them all at once.  On reflection, I think maybe the snowflakes would have stood out more if I had used just ordinary gold embossing powder, so there was more of a contrast. Not sure.
Finally I stuck the panels onto the card bases with double sided tape and the cards are finished.  


This would be quite an easy card to mass produce and is a little more modern for a Christmas card.

Here is the video of making the cards.  If you prefer to watch it on full HD on my You tube here


The materials I used for these cards are:
 2 Card base 5 x 7 inches 
2 card panels with Strathmore Bristol smooth watercolour paper
Post-it pad
Inkadinkadoo masking paper
Distress inks Blueprint sketch, peacock feathers,  chipped sapphire, dusty concord and wilted violet.
Ranger mini blending tool and sponges
Ranger non-stick mat
Painters tape
Snowflake stamp
Gold glitter embossing powder
Versamark ink
Versafine onyx black ink
Ranger Clear embossing powder
Misti
Heat tool
Sentiment from snowflake stamp set
Simon says stamp Warm wishes stamp set
double sided tape


 I hope you enjoyed another snowflake card.


Tuesday, 28 November 2017

Deer Scene Bauble card


This card can be done with any Christmas scene dies you might have, I have used a deer scene die, but really any of them would look great, something like a hillside with trees, or a nativity scene, or a snowy village or cottage, anything like this would work.

This teal coloured one is the one I did the video on, but I had done a previous version with an ombre effect with pinks and foiling the background.  I did do craft foam between each layer, and it ended up being quite dimensional, so the one I used in the video I simplified quite a bit for teaching purposes, but it really depends on whether you are going to post it or not.


The background I have used a snowy stencil and have stencilled Deco foil transfer gel and then let it dry and then foiled it with Heidi Swapp teal foil with the minc machine. 

To make the bauble, I cut out 4 circle frames and 1 full circle using 4 consecutive dies from a die set, making each one larger than the one before, to give an almost tunnel effect. The last one is the background.  The first one was in white, one in craft foam, and the rest were in teal.  

I then cut out the deer scene also in white and glued the white circle frame over this and trimmed it around the frame.  Then glued this with onto a frame cut out of craft foam each remaining frame and backing together. 


The foiled background was trimmed down,  I then wrapped some gross grain ribbon onto the top of the background and down to where the bauble was to be glued. and stuck that down, then glued the background onto the card base with foam tape between to give some dimension.  Then the bauble was glued over the end of the ribbon.  A bow made out of the same ribbon to go on top of the bauble and that is the card finished.  I didn't want to spoil the clean look by putting a sentiment on it, I think it speaks Christmas all by itself.  

Here is the pink version that I had done as a prototype.


Here is the video of making the card, if you prefer to see full HD then watch the video here on You tube.


The materials I used to make the teal card are:
Card base and panel 14cm x 14cm
Simon says stamp Falling Snow stencil
Deco foil transfer gel
Palette knife
Teal Heidi Swapp minc foil
Minc machine
Bassil blue calypso card
Circle dies in 4 sizes
craft foam
Deer & tree scene die (aliexpress)
Quilled precision tip applicator bottle
Cosmic shimmer dries clear glue
Scissors
Craft knife
Builders tape
Ranger non-stick mat
Double sided tape
teal ribbon
Bow maker 
Glue dot

Monday, 20 November 2017

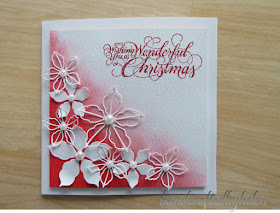
Distress inked card with Poinsettia

I have another card which is fairly easy to make and can be made in any colour you want to, I wanted to have the ink colour and the embossed sentiment to be the same, and the only combination I had was red.


I inked the bottom corner to the halfway mark with Candied apple distress ink onto Tim Holtz water colour card, making the very corner the darkest and blending it out.  

I then stamped this beautiful script sentiment, it is an old wooden stamp that I have had for years, but it has stayed relevant and I love it, with versamark ink and red glitter embossing powder and then heat set it.  I then cut down the panel so that it was about 1cm smaller all the way around from the base card, and put some craft foam between the panel and the card base.


Next was to cut out a range of poinsettia from the Sue Wilson Poinsettia die set which comes with full flowers and outline flowers.  


I put them in a rough triangular pattern on top of the blended background, shaping each one slightly with my fingers to give them slight dimension and then glued them in the centres.  
Lastly I put a flatback pearl into each centre and that was the card complete


If you would like to see the video of me making the card then watch here, or if you prefer HD then click here.


The craft supplies I used to make this card were:
Card base 14 x 14cm
Card panel the same size with Tim Holtz watercolour card
Distress ink Candied apple
Ranger mini blending tool and sponge
Wooden stamp with Christmas sentiment.
Zing red glitter embossing powder
Versamark ink
Heat tool
Embossing buddy
Craft foam
double sided tape
Sue Wilson  poinsettia die from Festive collection
Quilled precision applicator bottle
Cosmic shimmer dries clear glue
White flatback pearls in 6mm & 8mm
Craftmat
Craft knife

I think the red and white looks very striking, but equally it would look lovely in a teal or a purple or a hot pink, it doesn't need to be in traditional colours.  

Tuesday, 14 November 2017

Shabby Chic Poinsettia card

I thought I would throw in another Shabby Chic card into the mix for my Christmas card series this year.  I am using some Poinsettias I had made for making last years cards, so decided to do a white cream and gold theme.  


I started off with two scrapbook papers, one is a Kaisercraft paper from the Sea Breeze collection called 'Sea' and I used the side that had a lovely pale wood grain.  The second paper is a Teresa Collins paper called Noel, I used the music paper.  I cut them down to layer them, and distressed the edged and then stuck the woodgrain paper down first, backed the music paper with some craft foam and then stuck that down as well.  

Next came the poinsettias, that were made with an old die set from Marianne designs, I used three different sizes I think. There are lots of Poinsettia dies out there on the market, so just use what you have.  For the foliage I used the Impression Obsession Pine branch die and the holly branch also by Marianne Designs.  


I wanted to use one of the chipboard frames I had bought from 'Make it Crafty' in Australia some time ago, so I painted two coats of Gesso to make it white.  
I glued this down onto the music paper and then started arranging the poinsettia flowers and the foliage until I was happy with how they were looking. 
I made a string double bow and then a cream ribbon bow and tucked them under the poinsettias.  

I also had a brass looking metal snowflake embellishment, but decided to foil it with some gold foil, so I used some deco foil transfer gel and ran it through my minc machine once the transfer gel had dried.  I also had a paper clay frame I had made with a silicone mold, so I rubbed a little gold buff-it around the edge of that to tie it in. 


Lastly I made a sentiment banner and tucked one end under the paper clay frame, and curved it over the other side of the frame and stuck it down on the card with a glue dot.  

I stuck three bling star/flowers, one on the centre of the snowflake embellishment and two on the card to finish it off.

I always like to put my shabby chic cards into a handmade box, to protect the flowers and to allow for the dimension.  It just makes them look a little more special.  


So I decorated this box again with some left over foliage and some smaller poinsettia flowers from last year, these ones were made with the Cheery Lynn Poinsettia strip die. 

Here is a video on making the card or you can view it on full HD on my You tube channel here.


The materials I have used to make this card are:
Handmade box and card to fit it.
Kaisercraft 12 c 12 paper from Sea Breeze collection
Teresa Collins 12 x 12 paper called Noel
Marianne designs poinsettia die
Marianne designs holly branch die  
Impression Obsession Pine branch die
Gold micro beeds
Snowflake stamp set for sentiment
Ayleens Tacky glue
Versafine onyx black ink
Ranger clear embossing powder
Heat gun
Metal snowflake embellishment
Deco foil transfer gel
Champagne deco foil
Cream satin and organza ribbon
natural hemp string
Frame silicone mold
paper clay
Gold buff-it
Quilled precision applicator bottle
Cosmic shimmer dries clear glue
Cheery Lynn poinsettia strip die
Craftwise bling star flowers
Make it crafty chipboard oval frame
White gesso
Mushroom sponge
3L glue dots
double-sided tape
craft foam 
Tim Holtz distress tool


I hope you enjoyed the card, something a little different for a Christmas card but a style I particularly like, lots of components but really easy to put together for stunning results. 


Tuesday, 7 November 2017

Foiled snowflake card

This card is an easy easy card, but requires a laminator or minc machine and some toner activated foil.


I got some plain black snowflake clipart from the internet, (making sure they were copyright free) and made them various sizes and arranged them onto a document in a rough panel, printed them on a photocopier, or you can do it on a laser printer (it can't be an inkjet printer, as the foil doesn't work on ink). I then trimmed it down on the left side to where I thought it would look best on the card. (Just eye balled it)

I then cut out a piece of Minc foil in the hot pink that was the same size as my snowflake printout, with the coloured side up, I ran it through the minc machine.

I cut out a strip of some hot pink glitter card and put it down the left hand side of my card base, and trimmed it to the card base. 

i put a piece of silver foil washi tape down the left hand side of my foiled piece, and then stuck that down to the card base, overlapping the glitter card just very slightly, with double-sided tape, and then turned the card over and trimmed it to the card base.  


The sentiment is a Kaisercraft clear stamp called Mistletoe, I stamped this onto a scrap piece of card with versamark ink and then embossed it with silver embossing powder, put some craft foam on the back and stuck it to my card towards the bottom. I put a few iridescent stars dotted between the snowflakes just to fill in a few spaces.

Taadaa, the card is finished, very quick and easy.

Here is a video on how I made this card or view it on my video channel here.


The materials I used to make this card was:
5" x 7"card base
Snowflake clipart
White card for printing
Hot pink toner reactive foil (minc)
Minc machine
Hot pink glitter card
Silver foil washi tape
White irridenscent star sequins
Kaisercraft stamp set called Mistletoe
Versamark ink
Ranger silver embossing powder
Heat gun
double-sided tape
craft foam

Not all cards need to be complicated and sometimes it is just nice to do a really quick one, especially at Christmas when there is a hundred and one other things to do.  


Wednesday, 1 November 2017

Snowflake Wreath Card

Welcome to the first of my Christmas cards in the Christmas Card series 2017

This first,  one I saw a card with a snowflake wreath in a Cardmaking and Papercraft magazine about a year ago. and thought it looked lovely, stored it away in my memory banks, and dragged it out of the depths for this years card series.  Their card was white a blue, I decided to do a silver and white one, as I think that colour scheme is very elegant, but really this card leads to any colour combination. For some reason I love snowflake cards.  They aren't exactly appropriate for Christmas here in New Zealand, as we have a summer Christmas, but I just love snowflakes, so I make them anyway!


I started out by doing my card base. I put some stick-it double-sided sticky paper on the whole front of the card base, and then went around and peeled just the bottom centremetre  or so and sprinkled some white glitter onto it and burnished it in with a piece of scrap backing paper.  This makes the glitter really stick into the stick-it paper.  I left the middle part of the backing paper on and put it aside to work on the front panel for the time being.

For this, I traced around a circle die, to give me some idea of where the wreath was going to be, so I could work out where to put my sentiment. (The front panel is about 5mm smaller all the way around than the card base).  I cut out the 'happy' with a die out of silver mirror card and backed it with craft foam so that it stood up a little.  I stamped the 'christmas' with versamark ink and then embossed it with silver embossing powder.  Once that was done I backed it with craft foam and double sided tape, I then stuck it down onto the card base after I peeled off the remaining backing paper, but I did go around the edges with some glue to make sure it stuck to the glitter around the edge if it.   


Now I could work on my snowflake wreath.  I had cut out lots of snowflakes using two snowflake dies I had, they can be any you have.  I cut them out of a variety of cards, silver mirror, plain white card, silver glitter card, holographic silver card and white glitter card.  

I then proceded to stick the snowflakes down around the drawn circle, alternating the two sizes and the different 'colours'. I only glued the very centre of each snowflake, as I wanted it to have a loose dimensional look.  I kept doing layers of them, until I was happy with how 'full' it looked. It ended up being about 5 layers.  

Lastly I made a organza double bow and stuck a pearl star embellishment into the centre, and that was the card finished.  


I have a video here on how I made the card.  If you wish to see the video in full HD then see my youtube channel at https://www.youtube.com/channel/UC4d8uuWK4kwGnB6aEOUbZlg/videos?view_as=subscriber


The materials I have used are:
Card base 14 x 14cm
Card panel of 13 x 13cm
Stick-it double sided paper
Iridescent white glitter
Circle die
pencil 
Paper smooches Christmas sentiment dies
Scrap of silver mirror card
craft foam
Kaisercraft stamp Yuletide
Ranger silver embossing powder
Versamark ink
Heat gun
Silver mirror card, holographic silver card, silver and white glitter cards, plain white card.
Snowflake dies
Quilled precision applicator bottle
Cosmic shimmer dries clear glue
double-sided tape
EK success tweezers.

I hope you enjoyed the first of my 2017 Christmas cards

Wednesday, 18 October 2017

Treeline Men's card (easy)

Another card on the theme of Men's easy cards. This one could equally be another type of card, just by changing up the colours,  even a sympathy card, as it is quite a tranquil and peaceful card.

I have a Christmas stamp set called Vintage Christmas, which has a stamp in it that is a line of trees, and I thought it would make a great masculine card.


A very easy card to put together, I used some paper from a Lemoncraft paper pack that was woodgrain, and stuck it onto my card base.  I stamped the treeline stamp from the Christmas stamp set, onto Strathmore Bristol smooth watercolor paper with black versafine onyx black in and embossed it with clear embossing powder.  I then coloured it very lightly with tumbled glass distress ink, just to give a hint of colour.  I made a bunting with a piece of hessian fabric and cut a fish tale into it, stuck it onto the woodgrain paper.  Next i backed it with some left over grey card that I had when I cut our my card base, leaving a little bit top and bottom. 


Next I made a sentiment in the same bristol watercolor paper, made it into a banner and tied a bit of hemp string around one end. 


Stuck that down with foam tape and that is literally the card done and dusted.  
A very simple card for me, but the men in my life don't like fussy cards, so it will be great for them.  

Here is a video on how I made the card. If you want to watch it in full HD then check out my youtube channel at https://www.youtube.com/channel/UC4d8uuWK4kwGnB6aEOUbZlg/videos?view_as=subscriber


The materials I used to make the card were:
Vintage Christmas stamp
Lemoncraft Heart painted 6 x 6 paper pack 
Grey card for card base
Misti
post-it notes
Versafine Onyx black ink
Ranger clear embossing powder
Heat gun
Tumbled glass Distress ink
Ranger mini blending tool and sponges
Craft mat
Craft knife
metal ruler
Altenew birthday greetings stamp
Scissors
Natural thread
Hessian fabric ribbon
Quilled precision applicator bottle
Cosmic shimmer dries clear glue
double sided tape
Scotch foam tape

Thanks for stopping by my blog, and I hope you will look at your Christmas stamps and see if there are any you could use for other occasion cards.