Free background from VintageMadeForYou

Wednesday, 17 February 2016

Daisy Cluster cards


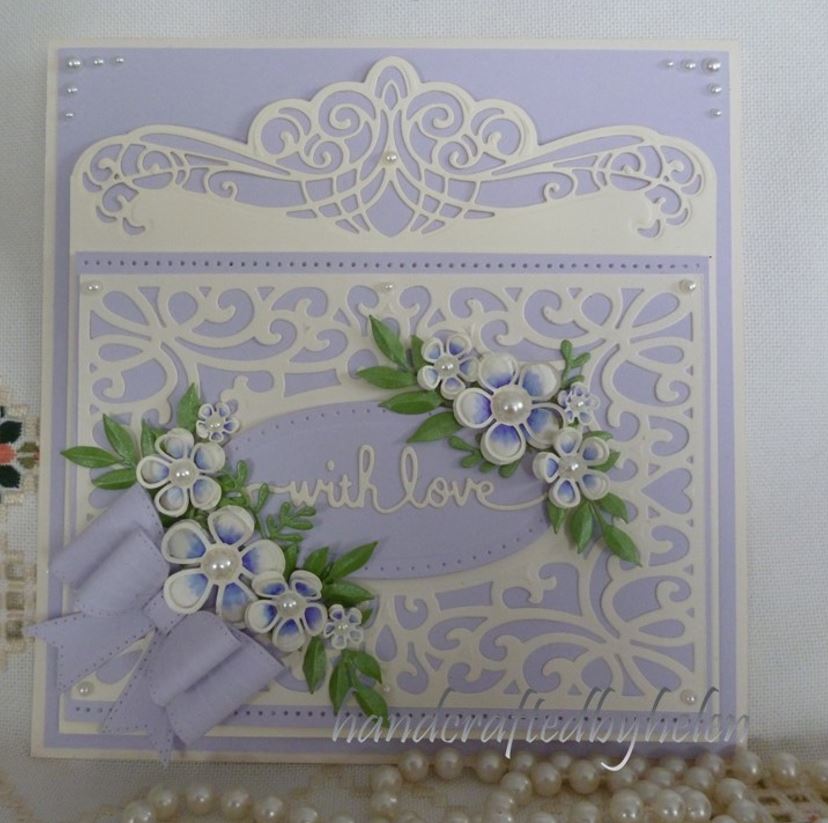
Three more cards made for Fat Cats Card Corner, this time with the Sue Wilson Daisy cluster die.

I want to give the full credit to Ecstasy Crafts Inc where I say their card with this die made into a wreath, and thought it was gorgeous, so I thought I could use that idea and make it into a frame.  So this card is very simple, I have embossed a panel with the Creative Expressions floral stripes embossing folder and have inked around the edges with Squeezed lemonade distress ink.  I cut out a circle aperture in this and put a vintage picture of a girl with yellow flower in her hair, behind and then mounted this onto a white card which I put a complete frame of tiny pearls around the edge.  This was mounted onto a card base that I had also inked around the edge with squeezed lemonade ink.  Lastly I cut out 6 of the daisy clusters in white, and then six of the back daisy part die with a matching yellow card.  I glued this to the back of each of the clusters and then mounted them around the aperture.  


This one I have cut the Sue Wilson New Zealand - Wellington die out of white card, and also the Sue Wilson Daisy Cluster dies on each side of it.  I trimmed it to leave a slight border around all the dies and mounted it onto some teal glitter card.  I made a frame of pierced holes around the teal card with the Tim Holtz piercing ruler.  Then it is raised onto a white card base with some foam.  I then placed the cut out Daisy cluster back into the negative space on each side, and put some tiny wee silver dazzlers into the centre of each daisy and into the centre of the Wellington die.  A teal bow with a dazzler to finish it off.  


This card I have cut out three of the daisy cluster dies in silver mirror cardboard and placed two of them onto a white piece of card and drew around the daisy clusters in a diagonal shape and then cut it out to leave an area below.  I then cut a piece of blue card to fit my card base and made some score lines with my Martha Steward scoring board and glued it to the card base. I cut my white card piece that I had cut a sort of scallop border at the bottom, to fit the size of the card base, and backed it with foam and mounted it onto the blue card on the base. I backed two vintage pictures with two tones of blue card and mounted them onto the white card piece. I cut 3 of the back pieces for the daisy cluster out of white card and glued them to the back of each of the silver cluster dies.  Finally I glued 2 of the daisy clusters to the edge of the scalloped border, and one over the two pictures.  I put 3 handmade white daisies onto the middle of each cluster and put a blue pearl into the centre of each.  

So three different ways to use this lovely die.

Tuesday, 16 February 2016

New Zealand Collection - Wellington

Living in New Zealand, I just had to have one of Sue Wilson's New Zealand Collection dies.  I decided on the Wellington, and here are some cards I have made with this beautiful die for Fat Cats Card Corner.  

All of these cards I have tried to keep them typically Sue Wilson in look.


This card I have tried to keep soft in look.  The intricate main part of the die I have cut twice, once in white and once in a soft green.  Then I have cut the outside die in a pale pink and glued the white die cut onto this.  The green die cut I cut in quarters through the middle part of the die.  This I have glued to the back of the medallion so that the peaks were in between the pink and white peaks.Hopefully that makes sense, you can see in the photo how it looks.  I mounted this onto a white panel that was embossed with the Sue Wilson floral stripes embossing folder, then this was mounted onto another white panel that has a border of piercing, then onto a pink panel and then a green panel and finally onto the card base.  Some pearls and a ribbon bow to finish it off.   


This one I have cut the main part of the die out in gold mirror card, which is absolutely stunning in real life.  I mounted this onto ivory (it looks white in the photo but it is actually ivory) card, which I tied a bow of gold organza ribbon. I mounted this onto some gold mirror card, then a panel with a pierced border, then onto another panel of gold mirror board, and finally a card base.  The flowers and leaves are the Sue Wilson Camellia open and complete die sets.  I put tiny Creative expressions pearls on the medallion and gold flat back pearls into the centre of the flowers.  


With this card I have used the negative part once I have cut out the die for the first card.  This is a completely different effect which I love.  Its like having two dies in one!

I have raised this up with foam, rounded the corners and mounted it onto some coral coloured card stock.  This I have then mounted on some white glitter card.  I then made a frame with some piercing around the inside of it, and then mounted it onto some more coral cardstock.  This I also raised up on some foam, and then made a card base that was exactly the same size as the frame.  Again some tiny pearls to finish it off, I didn't think this one needed a bow, it was elegant as it was.  

Monday, 15 February 2016

Ravello Striplet cards

I haven't done any card for Fat Cats Card Corner for a while, but I have done some Sue Wilson style cards with some of her dies. These cards are with the Ravello Striplets die.


This card I have cut out the Ravello Striplet in Ivory card in triplicate, mounted them with foam tape, and put them onto a panel that I have stuck gilding flakes (autumn leaves) onto a sticky sheet on cardboard. I put some brown ribbon around the panel. I finished off by mounting that panel onto some bronze metallic card stock and then onto a ivory card base.  


This card I have done it similar, but have cut out 3 of the outside striplet panels and mounted them behind the striplet die cut.  I have glued these to a panel that has been embossed with an absolutely gorgeous Creative Expression pinpoint embossing folder called Floral Brocade, mounted this onto a pierced border panel onto more mint card.  A mint ribbon and a mint dazzler and some tiny pearls to finish it off.


This one I cut the Striplet out of white card, cut two more striplets out of mauve card and inlayed the pieces of the flower part into the card front.  I then mounted this panel onto a black panel and then a mauve panel, and finally onto a white card.  I then cut out the New Zealand collection, Wellington die out of the mauve card and the outside die with white card, glued the mauve on top to make the medallion to go on the middle of the card.  Some tiny pearls, a mauve ribbon and a dazzler to finish it off. 

I kept these pretty traditional to the sorts of cards Sue Wilson does.  

Saturday, 21 November 2015

SW challenge

Hello everyone
A group I belong to called ''Pennyflowers'' have been doing a challenge for those that wanted to, on making an opulent card with Sue Wilson die cuts that our leader Angie had sent out to us.  We didn't know what we were going to get, all we had to do, was tell her what our favourite colours for cards were, and what if any of the Sue Wilson dies we had ourselves, so that she didn't double up on anything.  Well a wonderful packet arrived in the mail, and in it was these lovely pavo gemini border dies some cut into cream or mauve card, and some cut away as separate pieces, a whole packet of the beautiful open and complete Camellia petals from the finishing touches collection, some laurel leaves also from that collection, and a lattice and lace striplet die cut and backing piece, and some bow pieces.  So there is quite a few die pieces to make a variety of cards.  I decided to go with the pavo gemini die pieces that were cut into the cream card, as she had also included a mat piece in the mauve as well.  I wasn't sure what I was going to do with the middle part of the card, as I wanted it to be beautifully opulent as Sue Wilson cards are, so I finally decided on doing the background from the Austrian collection, as I already had it, and thought it fitted into the size of the card very well.  I decided I needed to do some paper piercing as all Sue Wilson cards should have, but there wasn't enough room with the mats that I had, but I did have room to do them top and bottom of the background die, so I decided to do that.  I coloured the centre of the complete camellia flower dies mauve and then put the open petals on top to add some lightness and delicacy. Finally I made one of the paper bows that also came with the die cuts and put it into the bottom corner.  Some pearls to finish it off.


I hope Angie is happy with what I have made, you never quite know what someone has in mind when they set challenges like this.  I love it, and am very happy with it.  
  

Wednesday, 14 October 2015

Bella's Party Card

I have another digital stamp that I have coloured.  This one is from makeitcrafty.com, I love their images.  


This one I have coloured with Reno Art alcohol markers, and have sponged the edges with a pink versa color ink and then mounted it on to a frame I have cut out with my Silhouette Cameo.  I have mounted it on some pretty Doodle bug paper.  With a scattering of sequins and tiny pink starts and a sentiment from an Altenew stamp set.  


Saturday, 10 October 2015

Girls Coloured with markers Cards

I have been taking an interest in the craze at the moment of adult colouring, but decided to have a go at some of the great digital stamps of girls that are available instead of the colouring books, and if they worked out, I would use them for some girls cards. I thought it might be useful to maybe put a number on the card and use for when my Niece and great Nieces are having their birthdays.  
I have been studying how to colour things like the hair, faces and folds of clothing by watching some amazing videos on Youtube. Some of the Sherri Baldy Colorology ladies and how they colour the Besties, how Zoe from makeitcrafty.com colours some of her images, and also people like çraftybits, Elisabeth Sarkis and many others that show how to colour images.  There are tons on Youtube. They are so helpful and so I felt confident in giving it a go. 

I purchased some digital stamps and away I went.  The first one I coloured, was this one which isn't actually a digital stamp but a free colouring page of a Moxie Girlz page.  I wanted to have a go and something that wasn't too challenging as far as the clothes went, but had some nice hair to colour.  


 This next one is a Saturated Canary one, that I kept seeing on Google images as a coloured digital stamp and loved it.


This last one is a ''Bestie'' image from Sherri Baldy, I love these, and ended up buying a few of these digital stamps. as they are so cute with such gorgeous big eyes.  So I will have a go at a few more of them.  I loved doing the layers of her dress and her hair, and I thing this ended up being my favourite. It is so much better in real life than it looks in the photo.


I have really loved doing these. and will definitely do more. 


Friday, 28 August 2015

Christmas card trio

I was having a play and doing some Christmas cards trying to decide which might be good for doing as my send out this year.  I love making shaker cards, so I decided to have a go at a couple.  The first two are what I came up with.  


I saw a card on pinterest that had been done by "created by Debbie 4000" and loved how she had created the snowy scene for her shaker card, so decided to case it (I hope she doesn't mind) but use the tree dies I had (Leanne Creatief  pine tree dies). I put some glue along the edges of the trees and stuck some creative expressions glacial ice on it to resemble snow. I used the Memory Box stitched square dies for the shaker part.  The Sentiment is the Kaisercraft Clear stamp set Mistletoe. 


This one is from a die I had used for Christmas cards last year, and thought it might make a nice shaker card.  It is the Cottage Cutz Nativity Ornament.  I made the shaker part by cutting out a circle in the front of the card with a nestabilities die which was exactly the same size as the outside edge of the ornament die, and put a strip of acetate behind it. I stamped the sentiment with the Merry Christmas sentiment from the Kaisercraft Yuletide clear stamp set.   I put fun foam behind the front.  I put a strip of silver and white diagonal striped washi tape down the left edge of the base card for the silver and red card. I made a strip by stamping some waste card with a flourish background stamp by Impression obsession and embossed it with a gold sparkle embossing powder and attached it to the left side of the gold and green card.  Before attaching the front of the card to the back, I put a strip of thin ribbon from the top of the acetate to the top of the card edge, and stuck it down behind.  I then filled the shaker part with red sequins for the silver card, and green for the gold card, and then stuck down the top part of the shaker.  (You can't see many of the green sequins in the photo, but they are there!)  Finally I stuck the die cut of the Ornament die down over the acetate to complete the card.


This last one is a bit different.  I have started liking 'CAS' (clean and simple) cards more and more. This one is using that philosophy.  

I have made a wreath design on the front of the card by drawing a light circle and then filling the edge with various sized gems to make as close to a circle as I could ge.  I then cut the front of the card with one of the edge dies from the Spellbinder A2 scalloped border die set.  The Merry Christmas is a die from Cheery Lynn, but I cut of the snowflakes as I wanted it plainer, with just the script writing.  I 
put a strip of Christmas striped paper along the bottom of the card base, added a string of gold thread from the wreath to the top of the card topper, and mounted this part on some fun foam to give some dimension, added a tiny bow with the gold thread as well to finish it off.