Free background from VintageMadeForYou

Thursday, 22 May 2014

Two Tattered Lace Fairy Cards

I have made a couple of cards using the Tattered Lace die 'Fairy Tinks' for the Fat Cats Card Corner.  It is a very cute die, and I think it lends itself very well to girls cards.


This one I cut it out from some pale blue card and then embossed it with versamark ink and some crystal sparkle embossing powder.  I also did the same with the two matting pieces behind the designer paper and the embossed white piece that the fairy is on.  The Embossing folder is the Kingston 'leaves and butterflies'.  The designer paper in the panel behind the flourish is a very pale blue with some glitzy leaves and flourishes on it, sorry you can't see it very well in the photograph.  The flourish is the Fanciful Flourish by Cheery Lynn and the sentiment is done with the centre doily from the Marianne dies Passe part-out round die set.  The flowers are a selection of bought flowers from my stash.


This second card I cut out the fairy die in three different colours, an pale apricot for the skin. Mauve for the dress, and a gold hologram card for the wings.


The papers are downloaded papers that I have printed out, the doily is the Marianne Creatables Doily frame LR0130.  The flowers are the Cheery Lynn Sweet Christine strip die and leaves are the Ash family Punch I have had for years.  The Sentiment is a Memory box pastry label set.  I have just drawn on the word 'Wish' freehand with a fine black pen.  

The Tattered Lace dies are such intricate and pretty dies, I love them, and hope to own more of them! 

Tuesday, 13 May 2014

Zinnia Garden

Another card done for Fat Cats Card corner, but this one I decided to something a little different for me, and decided to when I had made the flowers, and put the buttons in the centre, they looked a little like faces!  So I decided to make a fun wee garden setting with a gate and a fence, (not that you can see it very well).  


The flowers are made with the Cheery Lynn Sweet Christine Die strip, the grass was cut out on the Silhouette Cameo.  The gate is a Poppy Stamp die called Garden Trellis.  The cloud, leaves and stalks I just cut out feehand.  The butterflies were some I had cut out also on the Cameo ages ago, and cut out more than I needed to use again in other projects.  I think they really do look like little faces 

Mothers Day Card in Pink

Another card I have done in a Mother's day theme, this one using a background paper that had roses and music, so I cut out the centre with the Passe-partout die from Marianne Craftables.
This one was done for Fat Cats Card Corner 


Then the flowers including the buds were done with the Cheery Lynn Small Gardenia strip die set.  It makes such a pretty flower.  I used only the first few parts to make the buds.   The leaves were cut out with the Ash punch set I have had for years.  

Wednesday, 7 May 2014

Red & White Mother's Day Card


This weekend it is Mother's Day, so I thought I had better make a card for my Mum.  I didn't think I was going to get it finished, and was running out of time, but I got it made, and thought I would share it with you.


I have used two of the Vintage Decoration Marianne Creatables die for the LR0269 leaving a gap in the middle, and then making a liner in red by freehand cutting it. The Embossing folder is the K.Kingston 'Leaves and Butterflies' which I have had for ages, and love.  It is a great one for doing multiple times on a piece of card, and being able to do it from different sides without looking upside down.  The flowers are done with the new Cheery Lynn strip dies, the shaded flowers in the middle are the small Gardenia strip and the red ones are the Small sweet Christine strip with a brad in the middle.  Hopefully she will like it!

Saturday, 1 March 2014

80 Birthday Card

I have made a card for Fat Cats Card Corner this one using the Marianne Creatables Anja Border LR0300, which I think is really beautiful!


I cut out two of the main border, and stuck them together as mirror images of each other.  Mounted them on to a pale pink paper.  The centre is the tag from the Spellbinders radiant rectangles set.  The roses are made with a 5 petal die by Marianne Creatables called 'flower set die' from some time ago.  The white ones, I left out the centres and put in pink stamens.  The buds are made with just one of the petals that I have slit nearer to the centre, the cupped, glued onto some florist wire, and then glued a calyx to the bottom of the bud.  The tiny flowers are spiral roses using the Impression Obsession spiral flower die set.  The leaves are done with either the spellbinder rose leaf from their leaves set, and the Marianne Creatables  leafy swirl die. Finished off with a few pearls, and the 80 cut out with glitter card.


I finished it off by making a box on my  Silhouette Cameo with a window with acetate, so you can see the card inside.  
 

Pom Pom flower tutorial

I have been asked how I made a pom pom flower some time ago, and thought I would make a tutorial to show how it was made.  I do have to apologise about the quality of the photos, as I did it in a hurry, and for some reason, my embossing mat, has started disintegrating, and after I had taken the photos and made the flower, I see some of the photos show little dirty black specks that must be bits of the mat.  They look horrid, so I apologise for those.  I also used a light card to make them, it was about 160gsm, but I think it is probably a little thick, would probably be better with a paper.

I have used a cutting file on my silhouette cameo that I made myself from a picture of a punch I think, but it was quite a long time ago, so I cannot remember what punch it was from. You could use other punches or dies, and several that would be ok to use would be the stampin up Flower shop bundle punch, the Cheery Lynn Sweet William die, the Carl Sakura punch, the punch bunch blossom punch etc. The only thing to realise is that if you are using something like the blossom punch, if the petals don't go very far in to the centre, you may need to cut them into the centre a little, as later when you have to fold it up, you won't be able to.  

So here is the shape I used.  I cut a bunch of them out on the silhouette cameo, but you need 10 of them for each flower.  


The first thing you need to do is colour the centres of each flower, on both sides, this doesn't need to be terribly neat, as you just see a hint of colour on the inside of each of the petals when the flower is finished.  I used a colour called old rose, a versacolor ink.  


The next thing you need to do is shape and mold each of the petals on 9 of the flowers (you leave one that is not shaped), This give dimension and helps be able to fold the petals up.  So I go around each flower and mold the two edges of each petal all around the flower on one side.


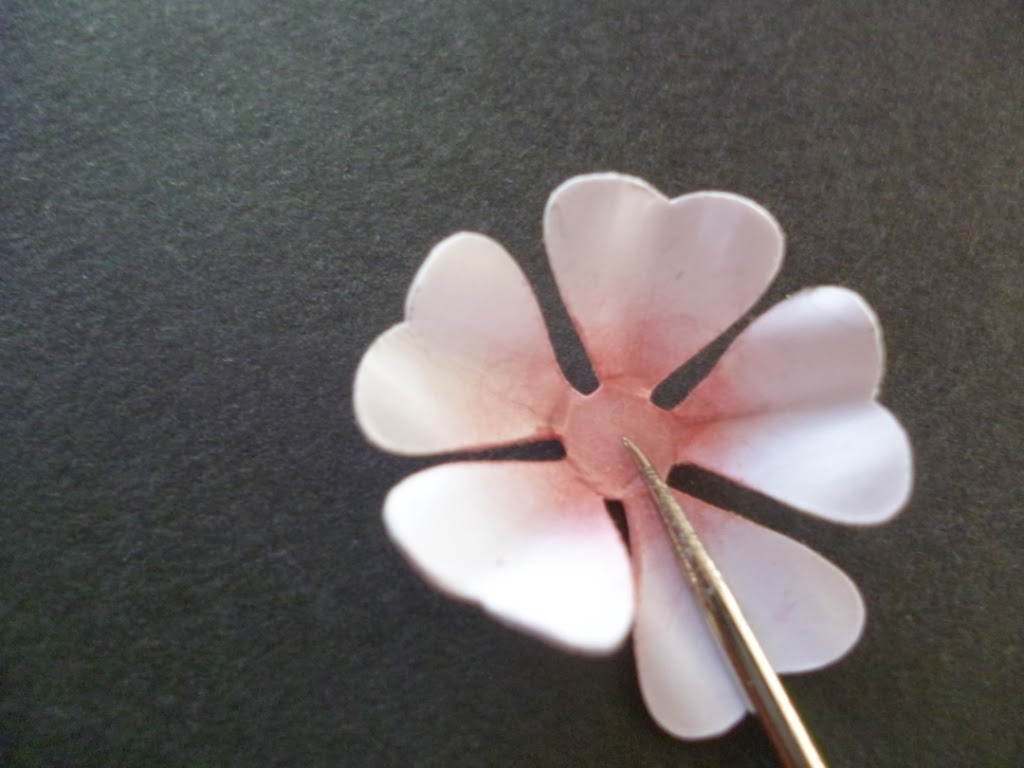
The next thing to do is flip the flower over, and mold the centre part of each petal all the way around the flower, you will see the petals begin to fold up as you go around. 


Once you have finished all 9 flowers, you need to cup each of the flowers and lightly squeeze the ends.


You are now ready to put the flower together, So take the one flower that you haven't shaped, this will be a base for the flower.  Put a dab of glue onto one side of a folded flower and glue it onto the base, positioning it to the edge of the outside of the base petals and staggered between two of the base petals,  like the photo below.


You now work around the rest of the base, doing this with 4 more of the petals. this forms a rosette of petals but leaves a whole in the centre, like below.


Now with the final three petals, you are going to stick them onto the top of the base layer, sometimes you need to push them down into the gap in the middle, as they tend to want to sit up a bit higher.  Just push them a little into the gap and they should look like the one below


This is completed, so just let it dry and it is ready to use on a card or a similar project.

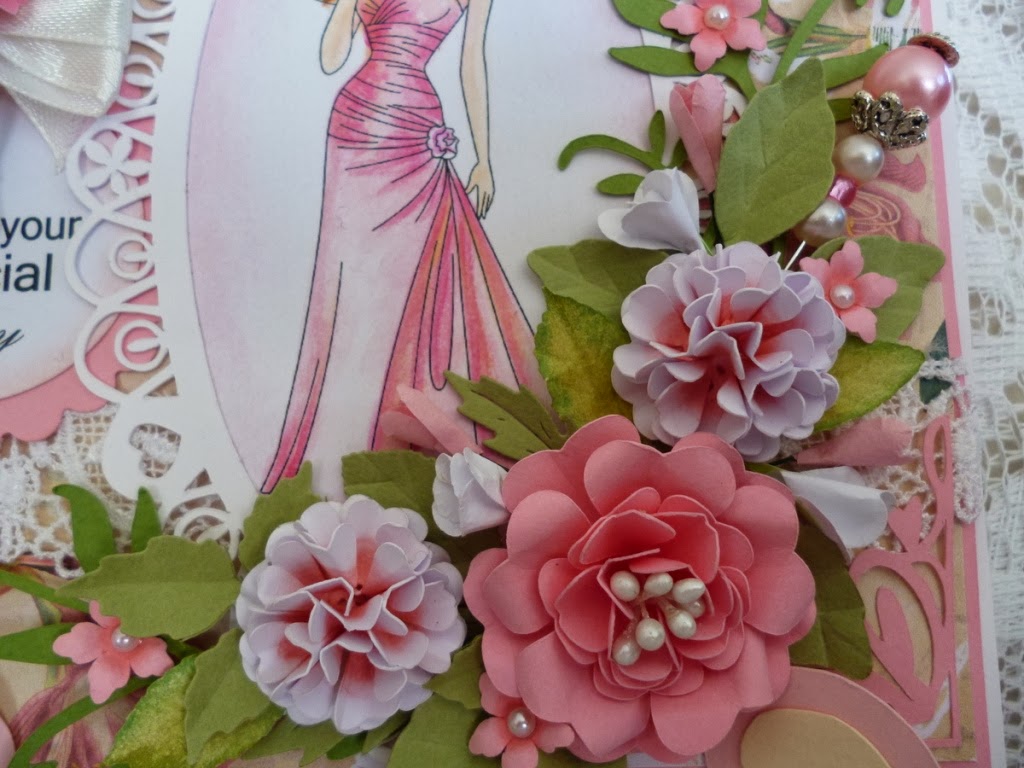
Here is an arrangement I used them on.  


I hope you like them.  I think depending on what die or punch you use, you can end up with a more frilly look like a carnation, especially if it has quite uneven or jagged edge to it.  


Friday, 21 February 2014

Wedding Cards ... I do ...

I haven't posted anything for such a long time, I don't know where the time goes some time!  Working full time, and then having various different projects on the go, trying to have a go at some cake decorating and sugar flowers, I just haven't had time to sit down and do some posts.

I have been doing cards when I have had a chance, and have managed to take some photographs of the Wedding ones I did recently, I just hadn't got to do the actual posts.

I had made some Wedding cards using a Digi stamp that I had purchased previously, and some with a couple of digi stamps I purchased recently. 

The first two are with the Digital stamp called Bella from Sassy Studio designs, she is such a pretty lady, and I love it! 


This one I have used the Spellbinder Fleur De Lis Rectangles and the Lace Corner set Deco  Die F.  The flowers I have made, and punched leaves, with some crystal stickles and pearls to finish.  


This second one is very similar, but this one I have used the Spellbinder Radiant Rectangles frame, a silhouette studio corner some roses and daisies I have made, with ribbon and pearls. 


These next three are digital stamps purchased from Redonkadoodles.
This Wedding couple I have cut out with the Spellbinders Gold Label Four die, some printable blue lace paper I got from a dvd that was in a Simply cards and Papercraft magazine some time ago, put out  by docrafts Digital Designer. The corner is the Lace Corner set Deco die B, more of my own flowers, and punched leaves with the Marianne creatables Leafy swirl die


This one I have used the same image, but have just done the top part, I have mounted it on the  Spellbinder A2 Filigree Delight Die set, mounted on some peach coloured lace paper.  Some lace down the side, and some of my own flowers again with some tiny punched daisies with pearls in the centre and in the brides hair, and punched leaves.   


Finally this one is again using the Spellbinder Fleur De Lis Rectangles, it is hard to see in the photo, but the detail on the brides dress has been highlighted with some crystal stickles.  The doily behind the flowers is a Birdcage card one found here, and the corner is from svg.cuts.  The main mauve flower is a die called Heirloom rose by MFT die-namics dies. The designer paper is a Jak Heath downloadable flourish paper.  

Hopefully these cards were worth waiting for.  I have made boxes for all of them to be put in so that it protects the 3D flowers.